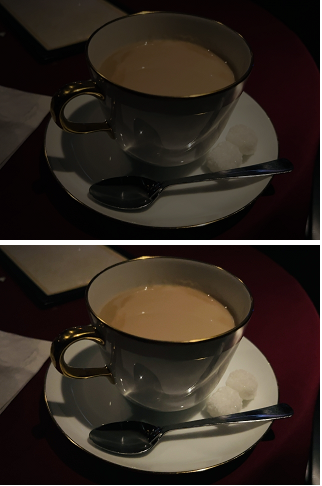
JavaScriptで地味な写真加工アプリをつくります。といってもやることは合成した色を元の写真に重ねるだけです。写真全体を明るくしたり暗くすることができるだけの地味な写真加工アプリです。

HTML部分
まずHTML部分を示します。ユーザーが画像をアップロードしてこれに重ねる色と不透明度を指定できるようにします。そしてできあがった画像をダウンロードできるようにしています。
|
1 2 3 4 5 6 7 8 9 10 11 12 13 14 15 16 17 18 19 20 21 22 23 24 25 26 |
<!DOCTYPE html> <html lang="ja"> <head> <meta charset="UTF-8"> <title>地味な写真加工アプリ</title> <meta name = "viewport" content = "width=device-width, initial-scale = 1.0"> <link rel = "stylesheet" href = "./style.css" type = "text/css" media = "all"> </head> <body> <h1>地味な写真加工アプリ</h1> <p>RGBAで合成した色を元の写真に重ねるだけの地味な写真加工アプリです。</p> <input id="file" type="file"> <button onclick="download()">ダウンロード</button> <div class="range"><span class = "r">R</span><input type="range" min="0" max="255" step="1" id = "red"><span class = "r" id = "r-value"></span></div> <div class="range"><span class = "g">G</span><input type="range" min="0" max="255" step="1" id = "green"><span class = "g" id = "g-value"></span></div> <div class="range"><span class = "b">B</span><input type="range" min="0" max="255" step="1" id = "blue"><span class = "b" id = "b-value"></span></div> <div class="range"><span class = "a">A</span><input type="range" min="0" max="1" step="0.01" id = "opacity"><span class = "a" id = "a-value"></span></div> <span id = "color"></span><span id = "color-code"></span> <canvas id = "canvas"></canvas> <script src= "./index.js"></script> </body> </html> |
style.css
|
1 2 3 4 5 6 7 8 9 10 11 12 13 14 15 16 17 18 19 20 21 22 23 24 25 26 27 28 29 30 31 32 33 34 35 36 37 38 39 40 41 42 43 44 45 46 47 |
h1 { font-size: 1.5em; } #canvas { display: block; margin-top: 20px; } #red, #green, #blue, #opacity{ width: 250px; vertical-align:middle; margin-right: 20px; } #color { border: 1px solid black; width: 100px; height: 20px; display: inline-block; vertical-align:middle; margin-right: 10px; } .r, .g, .b, .a{ font-weight: bold; margin-right: 10px; } .r{ color: red; } .g{ color:green; } .b{ color:blue; } .range { margin-bottom: 10px; } #file { margin-top: 10px; margin-bottom: 10px; } |
グローバル変数と定数
グローバル変数と定数を示します。
index.js
|
1 2 3 4 5 6 7 8 9 10 11 12 13 14 15 16 17 18 19 20 21 22 23 24 25 26 27 28 29 30 |
// レンジスライダー const $red = document.getElementById('red'); const $green = document.getElementById('green'); const $blue = document.getElementById('blue'); const $opacity = document.getElementById('opacity'); // 設定された色とカラーコードが表示される部分の要素 const $color = document.getElementById('color'); const $colorCode = document.getElementById('color-code'); // 各レンジスライダーのvalueが表示される部分の要素 const $rValue = document.getElementById('r-value'); const $gValue = document.getElementById('g-value'); const $bValue = document.getElementById('b-value'); const $aValue = document.getElementById('a-value'); // アップロードするファイルを指定する部分の要素 const $file = document.getElementById('file'); // canvas要素とコンテキスト const $canvas = document.getElementById('canvas'); const ctx = $canvas.getContext('2d'); // canvasのサイズと画像の拡大率 let canvasWidth = 0; let canvasHeight = 0; let magnificationRate = 1; // 読み込まれた画像 const image = new Image(); |
ページが読み込まれたときの処理
ページが読み込まれたときの処理を示します。
ここではイベントリスナーの追加と画像と設定された値を表示する処理をおこなっています。
index.js
|
1 2 3 4 |
window.onload = () => { addEventListeners(); // 後述 draw(); // 後述 } |
イベントリスナーの追加
イベントリスナーを追加する処理を示します。
ここではレンジスライダーを操作したとき、画像が読み込まれたとき、アップロードするファイルが指定されたときの処理を定義しています。
|
1 2 3 4 5 6 7 8 9 10 11 12 13 14 15 16 17 18 19 20 21 22 23 24 25 26 27 28 29 30 31 32 |
function addEventListeners(){ // レンジスライダーを操作したときの処理 const arr = [$red, $green, $blue, $opacity]; for(let i=0; i<arr.length; i++) arr[i].addEventListener('input', () => draw()); // 画像が読み込まれたときの処理 // 読み込まれた画像にあわせてcanvasのサイズを変更するが、幅の上限は360ピクセルとし、それより大きな画像は縮小して表示する image.addEventListener('load', () => { magnificationRate = 1; canvasWidth = image.width; if(canvasWidth > 360){ canvasWidth = 360; magnificationRate = 360 / image.width; } canvasHeight = image.height; if(magnificationRate != 1) canvasHeight = canvasHeight * magnificationRate; draw(); }); // アップロードするファイルが指定されたときの処理 $file.addEventListener('change', () => { const input = $file.files[0]; const reader = new FileReader(); reader.addEventListener('load', () => { image.src = reader.result; }); reader.readAsDataURL(input); }); } |
画像の描画
画像と設定された値を表示する処理を示します。
|
1 2 3 4 5 6 7 8 9 10 11 12 13 14 15 16 17 18 19 20 21 22 |
function draw(){ // レンジスライダーの値をその右側に表示 $rValue.innerHTML = $red.value; $gValue.innerHTML = $green.value; $bValue.innerHTML = $blue.value; $aValue.innerHTML = $opacity.value; // canvasのサイズを変更 $canvas.width = canvasWidth; $canvas.height = canvasHeight; // canvasに画像を描画 ctx.drawImage(image, 0, 0, canvasWidth, canvasHeight); // レンジスライダーの値を取得して設定されている色とカラーコードを表示する $color.style.backgroundColor = `rgb(${$red.value}, ${$green.value}, ${$blue.value})`; $colorCode.innerHTML = `rgb(${$red.value}, ${$green.value}, ${$blue.value})`; // canvasに画像に設定されている色を重ねる ctx.fillStyle = `rgba(${$red.value}, ${$green.value}, ${$blue.value}, ${$opacity.value})`; ctx.fillRect(0, 0, canvasWidth, canvasHeight); } |
画像をダウンロードする
ダウンロードボタンがクリックされたときの処理を示します。
canvasに表示されている画像をファイルとして保存すればよいのですが、縮小された状態で表示されているかもしれないので、もうひとつ見えない場所に原寸大のcanvasを生成してそこに描画します。そのあとこれをダウンロードしてファイルとして保存します。
|
1 2 3 4 5 6 7 8 9 10 11 12 13 14 15 16 |
function download(){ // 原寸大のcanvasを生成してそこに描画 const $canvas2 = document.createElement('canvas'); const ctx2 = $canvas2.getContext('2d'); $canvas2.width = image.width; $canvas2.height = image.height; ctx2.drawImage(image, 0, 0); ctx2.fillStyle = `rgba(${$red.value}, ${$green.value}, ${$blue.value}, ${$opacity.value})`; ctx2.fillRect(0, 0, image.width, image.height); // ダウンロードリンクを生成してクリックした処理をおこなう const a = document.createElement('a'); a.href = $canvas2.toDataURL('image/png'); a.download = 'image.png'; a.click(); } |

こんにちは。写真加工アプリ良いですね。
これをベースに、機能変更&追加したバージョンを作ってみました。機能変更&追加についてはCopilotの力を借りました。
https://ok2nd.github.io/tool/photo/edit-rgb/tool.html
<主な機能変更&追加内容>
・画像アップロードを、ボタンによる選択でなく、ドラッグ&ドロップで行う。
・リセットボタン、全てリセットボタンの追加。
・ダウンロードファイル名をオリジナルファイル名+RGB、opacity値とした。
この件について、私のブログ(https://2ndart.hatenablog.com/archive)に書いてもよろしいでしょうか?
もちろん、https://lets-csharp.com/simple-photo-processing/のリンクは貼らせていただきます。