前回作成したレーザービームのエフェクトと爆発のエフェクトをつかってゲームをつくります。
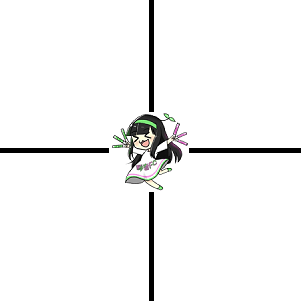
プレイヤーとしてこの画像を使用します。

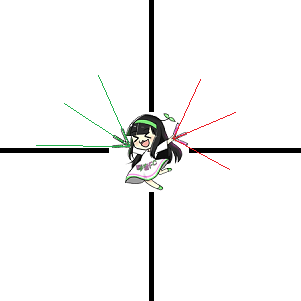
このペンライトの部分からレーザービームを発射させます。
これは上記の画像の幅と高さを80ピクセルに変更して(150, 150)が中心になるように配置したものです。

補助線を引くとレーザーはどこからどの方向に発射すればよいかがわかります。

あとはその方向にレーザーを発射する処理を書くだけです。
また敵キャラと敵の弾丸はこれを使います。


それでは作成していきましょう。
HTML部分
HTML部分部分を示します。
|
1 2 3 4 5 6 7 8 9 10 11 12 13 14 15 16 17 18 19 20 21 22 23 24 25 26 27 28 29 30 |
<!DOCTYPE html> <html lang="ja"> <head> <meta charset="UTF-8"> <title>鳩でもわかるレーザービーム</title> <meta name = "viewport" content = "width=device-width, initial-scale = 1.0"> <link rel = "stylesheet" href = "./style.css" type = "text/css" media = "all"> </head> <body> <div id = "container"> <div id = "field"> <canvas id = "canvas"></canvas> <button class = "button" id = "start">START</button> <button class = "button" id = "up">UP</button> <button class = "button" id = "left">LEFT</button> <button class = "button" id = "right">RIGHT</button> <button class = "button" id = "down">DOWN</button> </div> <p><input type="checkbox" id = "hide-buttons"><label for = "hide-buttons">スマホ用の操作ボタンを隠す</label></p> <p><input type="checkbox" id = "auto-shot"><label for = "auto-shot">自動連射モード</label></p> <p><label for = "volume-range">音量:</label><input type="range" id = "volume-range" min="0" max="100" step="1"> <span id = "volume-value">0</span></p> <p><button id = "test">音量テスト</button></p> </div> <script src= "./index.js"></script> </body> </html> |
style.css
|
1 2 3 4 5 6 7 8 9 10 11 12 13 14 15 16 17 18 19 20 21 22 23 24 25 26 27 28 29 30 31 32 33 34 35 36 37 38 39 40 41 42 43 44 45 46 47 48 49 50 51 52 53 54 |
body { background-color: #000; color: #fff; } #container { width: 360px; } #field { width: 360px; height: 480px; position: relative; } .button { width: 160px; height: 70px; position: absolute; background-color: transparent; color: #fff; border-color: #fff; } #up, #down, #left, #right { display: none; } #start, #up { left: 100px; top: 220px; } #left { left: 10px; top: 310px; } #right { left: 190px; top: 310px; } #down { left: 100px; top: 400px; } #volume-range { vertical-align: middle; width: 200px; margin-left: 10px; margin-right: 10px; } |
グローバル変数と定数
index.js
|
1 2 3 4 5 6 7 8 9 10 11 12 13 14 15 16 17 18 19 20 21 22 23 24 25 26 27 28 29 30 31 32 33 34 35 36 37 38 39 40 41 42 43 44 45 46 47 48 49 50 51 52 53 54 55 56 57 58 59 60 61 62 63 64 |
// canvas要素とコンテキスト const $canvas = document.getElementById('canvas'); const ctx = $canvas.getContext('2d'); // ボタン要素 const $start = document.getElementById('start'); const $up = document.getElementById('up'); const $down = document.getElementById('down'); const $left = document.getElementById('left'); const $right = document.getElementById('right'); const ctrlButtons = [$up, $down, $left, $right]; // canvasのサイズ const CANVAS_WIDTH = 360; const CANVAS_HEIGHT = 480; const MAX_PLAYER_LIFE = 10; // 10回被弾したらゲームオーバー const PLAYER_SIZE = 80; // プレイヤーのサイズと移動速度 const PLAYER_SPEED = 2; const ENEMY_SIZE = 48; // 敵のサイズ const ENEMY_BULLET_SIZE = 12; // 敵弾のサイズと移動速度 const ENEMY_BULLET_SPEED = 4; // 描画に使うイメージ const playerImage = new Image(); const enemyImage0 = new Image(); const enemyImage1 = new Image(); const enemyBullet = new Image(); // レーザーの描画に関する設定 const settingLaser = { 'length':100, // レーザー光線の長さ 'speed':8, // 移動速度 'shadow-blur':16, // 境界のぼかし 'width':4, // レーザー光線の幅 'draw-count':4, // ひとつのレーザー光線を描画する回数(回数を増やすとぼかしが濃くなる) } // 爆発の描画に関する設定 const settingExplode = { 'core-color': 'rgb(200, 200, 200)', // 火球の中心部の色 'edge-color0': 'rgb(0, 200, 200)', // 火球(タイプ 0)の境界部分の色 'edge-color1': 'rgb(200, 0, 200)', // 火球(タイプ 1)の境界部分の色 'shadow-blur':24, 'draw-count':1, 'fireball-life':28, // 火球の寿命 'growing-max-life':26, // 火球が大きくなりつづける寿命 'fireball-delay':10, // 次の火球が出現するまでの時間(ミリ秒) 'fireballs-count':8, // ひとつの爆発で出現する火球の数 'explosion-radius':16, // 爆発の中心点と火球が出現する位置の距離の最大値 } let backColor = '#000'; // 背景の色(ダメージを受けたときは一瞬だけ赤くする) let volume = 30; // 効果音のボリューム(0~100) let player = null; // Playerオブジェクトを格納する変数 let lasers = []; // Laser、Enemy、EnemyBullet、Fireballオブジェクトを格納する配列 let enemies = []; let enemyBullets = []; let fireballs = []; let updateCount = 0; // 更新回数 |
Soundクラスの定義
効果音を再生するためにSoundクラスを定義します。同じ効果音を短い間隔で再生するため、最初にAudioオブジェクトを複数生成しておき、交互に使います。
|
1 2 3 4 5 6 7 8 9 10 11 12 13 14 15 16 17 18 19 20 21 22 23 24 25 26 27 28 29 30 31 32 33 34 35 36 37 38 39 40 41 42 43 44 45 46 47 48 49 50 51 |
class Sound { constructor(){ this.DamageSound = new Audio('./sounds/damage.mp3'); this.GameoverSound = new Audio('./sounds/gameover.mp3'); // 発射音と命中音は短い間隔で何度も再生するため、最初にAudioオブジェクトを複数生成しておく this.ShotSounds = []; this.HitSounds = []; this.HitPlayCount = 0; this.ShotPlayCount = 0; for(let i = 0; i < 8; i++){ const sound = new Audio('./sounds/shot.mp3'); this.ShotSounds.push(sound); } for(let i = 0; i < 32; i++){ const sound = new Audio('./sounds/hit.mp3'); this.HitSounds.push(sound); } } PlayShotSound(){ // 配列内のオブジェクトを交互に使う this.ShotPlayCount++; const sound = this.ShotSounds[this.ShotPlayCount % this.ShotSounds.length]; sound.volume = volume / 100; // 0~100 を 0~1.0 に変換する sound.play(); } PlayHitSound(){ this.HitPlayCount++; const sound = this.HitSounds[this.HitPlayCount % this.HitSounds.length]; sound.volume = volume / 100; sound.play(); } PlayDamageSound(){ const sound = this.DamageSound; sound.currentTime = 0; sound.volume = volume / 100; sound.play(); } PlayGameoverSound(){ const sound = this.GameoverSound; sound.volume = volume / 100; sound.play(); } } const sound = new Sound(); // クラスを定義したらインスタンスを生成する |
Laserクラスの定義
レーザーの状態を更新し描画するためにLaserクラスを定義します。
コンストラクタ
コンストラクタを示します。レーザーのタイプは2種類です。そのイメージは何回も使うので一度生成したらそれを静的配列のなかに格納しておきます。
|
1 2 3 4 5 6 7 8 9 10 11 12 13 14 15 16 17 18 19 20 21 22 23 24 25 26 27 28 29 30 31 32 33 34 35 36 37 38 39 40 41 42 43 44 45 46 47 |
class Laser { static Images = []; constructor(sx, sy, rad, type){ this.HeadX = sx; this.HeadY = sy; this.Rad = rad; this.IsDead = false; this.Type = type; this.VX = settingLaser['speed'] * Math.cos(rad); this.VY = settingLaser['speed'] * Math.sin(rad); this.MovingDistance = 0; // 描画に使うイメージがない場合は生成する if(Laser.Images[type] == undefined){ this.shadowBlur = settingLaser['shadow-blur']; const $tempCanvas = document.createElement('canvas'); $tempCanvas.width = settingLaser['length'] + this.shadowBlur * 2; $tempCanvas.height = this.shadowBlur * 2; const tempCtx = $tempCanvas.getContext('2d'); tempCtx.lineWidth = settingLaser['width']; let color = '#0f0'; if(type == 1) color = '#f0f'; tempCtx.strokeStyle = color; tempCtx.shadowColor = color; tempCtx.shadowBlur = this.shadowBlur; for(let i = 0; i < settingLaser['draw-count']; i++){ tempCtx.beginPath(); tempCtx.moveTo(this.shadowBlur, this.shadowBlur); tempCtx.lineTo(settingLaser['length'] + this.shadowBlur, this.shadowBlur); tempCtx.stroke(); } tempCtx.shadowBlur = 0; const dataUrl = $tempCanvas.toDataURL(); const image = new Image(); image.src = dataUrl; Laser.Images[type] = image; } } } |
更新と描画の処理
更新と描画の処理を示します。先端部分の座標をVX、VYだけ移動させます。もしレーザー全体がcanvasから外に出た場合は死亡フラグをセットします。描画するとき移動総量がレーザー本体の長さに満たない場合は後ろの部分は描画しません。
|
1 2 3 4 5 6 7 8 9 10 11 12 13 14 15 16 17 18 19 20 21 22 23 24 25 26 27 28 29 30 31 32 33 34 35 36 37 38 |
class Laser { Update(){ // 先端部分を移動させるとともに移動総量も記録する this.HeadX += this.VX; this.HeadY += this.VY; this.MovingDistance += Math.sqrt(Math.pow(this.VX, 2) + Math.pow(this.VY, 2)); settingLaser['length'] if(this.HeadX < -settingLaser['length']) this.IsDead = true; if(this.HeadX > CANVAS_WIDTH + settingLaser['length']) this.IsDead = true; if(this.HeadY < -settingLaser['length']) this.IsDead = true; if(this.HeadY > CANVAS_HEIGHT + settingLaser['length']) this.IsDead = true; } Draw(){ // 移動総量がレーザー本体の長さに満たない場合は後ろの部分は描画しない // shortは描画しない部分の長さ let short = settingLaser['length'] - this.MovingDistance; if(short < 0) short = 0; ctx.save(); ctx.translate(this.HeadX, this.HeadY); ctx.rotate(this.Rad); ctx.translate(-this.HeadX, -this.HeadY); const x = this.HeadX - settingLaser['length'] - settingLaser['shadow-blur']; const y = this.HeadY - settingLaser['shadow-blur']; const w = Laser.Images[this.Type].width; const h = Laser.Images[this.Type].height; ctx.drawImage(Laser.Images[this.Type], x + short, y, w - short, h); ctx.restore(); } } |
Fireballクラスの定義
爆発の描画をするためにFireballクラスを定義します。
やっていることは 爆発のエフェクトをシミュレーションする とあまり変わりません。火球を大量生成するため、一度生成したイメージを再利用できるように配列のなかに格納しているのと、火球の色が複数ある点が異なるだけです。
|
1 2 3 4 5 6 7 8 9 10 11 12 13 14 15 16 17 18 19 20 21 22 23 24 25 26 27 28 29 30 31 32 33 34 35 36 37 38 39 40 41 42 43 44 45 46 47 48 49 50 51 52 53 54 55 56 |
class Fireball{ // 火球の種類は2つあるので配列も2つ用意する static Images = [ [],[] ]; constructor(x, y, type){ this.Type = type; this.X = x; this.Y = y; this.Radius = 1; this.UpdateCount = 0; this.IsDead = false; } Update(){ // 更新回数がgrowing-max-life以下なら火球を大きくする this.UpdateCount++; if(this.UpdateCount < settingExplode['growing-max-life']) this.Radius += 1; // 更新回数がfireball-lifeを超えたら死亡フラグをセットする if(this.UpdateCount > settingExplode['fireball-life']) this.IsDead = true; } Draw(){ if(this.IsDead) return; // イメージが存在しない場合は生成する if(Fireball.Images[this.Type][this.UpdateCount] == undefined){ const $tempCanvas = document.createElement('canvas'); $tempCanvas.width = (this.Radius + settingExplode['shadow-blur']) * 2; $tempCanvas.height = (this.Radius + settingExplode['shadow-blur']) * 2; const tempCtx = $tempCanvas.getContext('2d'); tempCtx.shadowBlur = settingExplode['shadow-blur']; if(this.Type == 0) tempCtx.shadowColor = settingExplode['edge-color0']; else tempCtx.shadowColor = settingExplode['edge-color1']; tempCtx.fillStyle = settingExplode['core-color']; tempCtx.beginPath(); tempCtx.arc(this.Radius + settingExplode['shadow-blur'], this.Radius + settingExplode['shadow-blur'], this.Radius, 0, Math.PI * 2); for(let i = 0; i < settingExplode['draw-count']; i++) tempCtx.fill(); const image = new Image(); image.src = $tempCanvas.toDataURL(); Fireball.Images[this.Type][this.UpdateCount] = image; } const image = Fireball.Images[this.Type][this.UpdateCount]; ctx.drawImage(image, this.X-image.width/2, this.Y-image.height/2); } } |
