JavaScriptでレーザービームのようなエフェクトを作ります。レーザービームをただの直線ではなく周囲をボンヤリと明るくさせます。
調べてみるとやり方は簡単。ctx.shadowColorとctx.shadowBlurを設定するだけです。
Contents
レーザービームっぽい直線を描画する
|
1 2 3 4 5 6 7 8 9 10 11 12 |
<!DOCTYPE html> <html lang="ja"> <head> <meta charset="UTF-8"> <title>鳩でもわかるレーザービーム</title> <meta name = "viewport" content = "width=device-width, initial-scale = 1.0"> </head> <body> <canvas id = "canvas"></canvas> <script src= "./index.js"></script> </body> </html> |
index.js
|
1 2 3 4 5 6 7 8 9 10 11 12 13 14 15 16 17 18 19 20 21 22 23 24 25 26 27 28 29 30 31 32 33 34 35 36 |
const $canvas = document.getElementById('canvas'); const ctx = $canvas.getContext('2d'); const CANVAS_WIDTH = 360; const CANVAS_HEIGHT = 360; const LINE_WIDTH = 2; const LINE_COLOR = '#0ff'; const SHADOW_BLUR = 32; function drawLine(x1, y1, x2, y2){ ctx.beginPath(); ctx.moveTo(x1, y1); ctx.lineTo(x2, y2); ctx.lineWidth = LINE_WIDTH; ctx.strokeStyle = LINE_COLOR; ctx.stroke(); } function drawBlurLine1(x1, y1, x2, y2){ ctx.lineWidth = LINE_WIDTH; ctx.strokeStyle = LINE_COLOR; ctx.shadowColor = LINE_COLOR; ctx.shadowBlur = SHADOW_BLUR; drawLine(x1, y1, x2, y2); ctx.shadowBlur = 0; } window.onload = () => { $canvas.width = CANVAS_WIDTH; $canvas.height = CANVAS_HEIGHT; ctx.fillStyle = '#000'; ctx.fillRect(0, 0, CANVAS_WIDTH, CANVAS_HEIGHT); drawBlurLine1(50, 50, 200, 200) } |
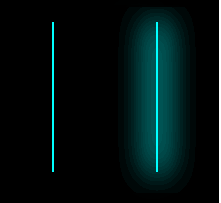
ぼかしの調整
ぼかしが薄すぎる場合は何回か繰り返して描画することでそれっぽく描画させることができます。
|
1 2 3 4 5 6 7 8 9 10 11 12 13 14 15 16 17 18 19 |
function drawBlurLine2(x1, y1, x2, y2, drawCount){ ctx.lineWidth = LINE_WIDTH; ctx.strokeStyle = LINE_COLOR; ctx.shadowColor = LINE_COLOR; ctx.shadowBlur = SHADOW_BLUR; for(let i = 0; i < drawCount; i++) drawLine(x1, y1, x2, y2); ctx.shadowBlur = 0; } window.onload = () => { $canvas.width = CANVAS_WIDTH; $canvas.height = CANVAS_HEIGHT; ctx.fillStyle = '#000'; ctx.fillRect(0, 0, CANVAS_WIDTH, CANVAS_HEIGHT); drawBlurLine2(50, 50, 200, 200) } |
ぼかしの効果をシミュレーションする
発射ボタンをクリックするとレーザーが発射されたような描画をさせてみます。またレーザービームを描画する回数を変化させることでどのようにぼかしの効果が得られるのかがシミュレーションできるようにします。
|
1 2 3 4 5 6 7 8 9 10 11 12 13 14 15 16 17 18 19 20 21 22 23 24 25 26 27 28 29 30 31 32 |
<!DOCTYPE html> <html lang="ja"> <head> <meta charset="UTF-8"> <title>鳩でもわかるレーザービーム</title> <meta name = "viewport" content = "width=device-width, initial-scale = 1.0"> <style> #container { width: 360px; } #shot { width: 200px; height: 60px; text-align: center; } #range-draw-count { vertical-align: middle; margin-right: 10px; } </style> </head> <body> <div id = "container"> <canvas id = "canvas"></canvas> <div id = "update-count"></div> <p><button id = "shot">発射</button></p> <p>描画回数:<input type="range" min = "1" max="100" step="1" value="1" id = "range-draw-count"><span id = "draw-count"></span></p> </div> <script src= "./index.js"></script> </body> </html> |
グローバル変数と定数
グローバル変数と定数を示します。
index.js
|
1 2 3 4 5 6 7 8 9 10 11 12 |
const $canvas = document.getElementById('canvas'); const ctx = $canvas.getContext('2d'); const CANVAS_WIDTH = 360; const CANVAS_HEIGHT = 360; const LINE_WIDTH = 2; const LINE_COLOR = '#0ff'; const SHADOW_BLUR = 32; const positions = []; // レーザービームの先端部と尾部の座標の配列 let updateCount = 0; // 更新回数 |
drawLine関数とdrawBlurLine関数は上記のものと同じです。
|
1 2 3 4 5 6 7 8 9 10 11 12 13 14 15 16 17 18 |
function drawLine(x1, y1, x2, y2){ ctx.beginPath(); ctx.moveTo(x1, y1); ctx.lineTo(x2, y2); ctx.lineWidth = LINE_WIDTH; ctx.strokeStyle = LINE_COLOR; ctx.stroke(); } function drawBlurLine(x1, y1, x2, y2, drawCount){ ctx.lineWidth = LINE_WIDTH; ctx.strokeStyle = LINE_COLOR; ctx.shadowColor = LINE_COLOR; ctx.shadowBlur = SHADOW_BLUR; for(let i = 0; i < drawCount; i++) drawLine(x1, y1, x2, y2); ctx.shadowBlur = 0; } |
ページが読み込まれたときの処理
ページが読み込まれたらcanvasのサイズを調整して発射ボタンをクリックしたらレーザービームを発射する処理がおこなわれるようにします。そして更新処理を開始します。
|
1 2 3 4 5 6 7 |
window.onload = () => { $canvas.width = CANVAS_WIDTH; $canvas.height = CANVAS_HEIGHT; document.getElementById('shot').addEventListener('click', () => shot()); update(); } |
発射時の処理
発射ボタンがクリックされたらレーザービームの先端部と尾部の座標をセットします。今回はサンプルプログラムなので同じ場所から同じ方向に発射されるようにしています。
|
1 2 3 4 5 6 7 8 9 |
function shot(){ const position = { headX: 0, headY: 0, tailX: -100, tailY: -100, }; positions.push(position); } |
更新と描画の処理
更新処理の部分を示します。
|
1 2 3 4 5 6 7 8 9 10 11 12 13 14 15 16 17 18 19 20 21 22 23 |
function update(){ // canvasの背景を黒で塗りつぶす ctx.fillStyle = '#000'; ctx.fillRect(0, 0, CANVAS_WIDTH, CANVAS_HEIGHT); // ひとつのレーザービームに対して何回描画処理をおこなうのかを取得する const drawCount = document.getElementById('range-draw-count').value; document.getElementById('draw-count').innerText = drawCount; for(let i = 0; i < positions.length; i++){ // レーザービームの座標を移動させて描画する positions[i].headX += 8; positions[i].headY += 8; positions[i].tailX += 8; positions[i].tailY += 8; drawBlurLine(positions[i].headX, positions[i].headY, positions[i].tailX, positions[i].tailY, drawCount); } // 更新処理がおこなわれた回数を表示する updateCount++; document.getElementById('update-count').innerText = '更新回数:' + updateCount; requestAnimationFrame(update); } |
描画回数を変えることでレーザービームっぽく見えたり見えなかったりすることが確認できると思います。また描画回数を大きくしすぎると動作速度が極端に低下してしまうことも確認できます。これに関しては生成したレーザービームを何度も描画するのではなく、一度描画されたものを再利用することで処理にかかる時間を短縮するなどの工夫が必要です。
