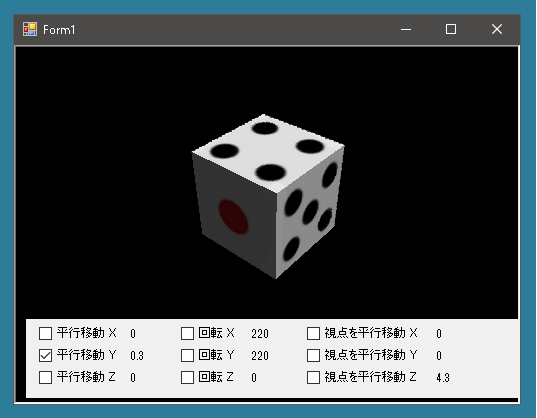
では立方体を移動させるプログラムを作成しました。今回は立方体の各面にサイコロの目を描画します。

さてどうすればいいのでしょうか?
「OpenTK 画像」とか「OpenTK 画像 3D」で検索してもなかなか情報が得られず困っていたところ、YouTubeでこんな動画をみつけました。英語なので何を言っているのかさっぱりわからないけどコードはだいたいわかるような気がします。
これを参考にして以下のようなコードを作成しました。
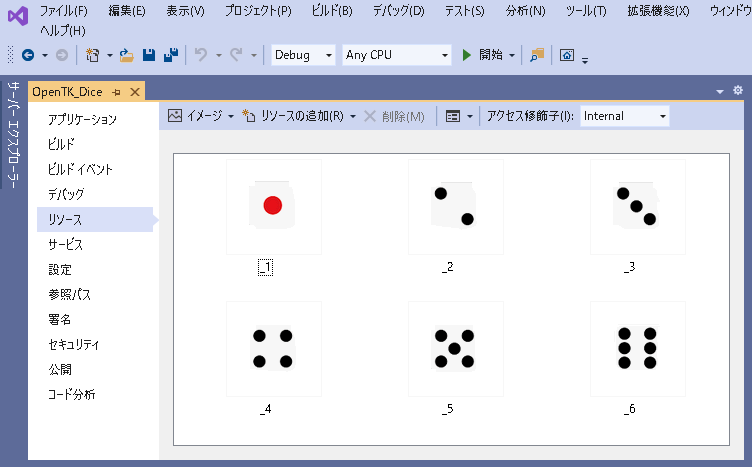
まずサイコロの目をビットマップで作成して、テクスチャ領域にピクセルデータを貼り付けます。そして立方体を描画するときにテクスチャをひもづけて各面の描画をおこないます。
用意したビットマップ

|
1 2 3 4 5 6 7 8 9 10 11 12 13 14 15 16 17 18 19 20 21 22 23 24 25 26 27 28 29 30 31 32 33 34 35 36 37 38 39 40 41 42 43 44 45 46 47 48 49 50 51 52 53 54 55 56 57 58 59 60 61 62 63 64 65 66 67 68 |
public partial class Form1 : Form { /// <summary> /// 初期設定 /// </summary> void Init() { GL.ClearColor(glControl.BackColor); // Projection の設定 SetProjection(); // デプスバッファの使用 GL.Enable(EnableCap.DepthTest); // 視界の設定 SetInitSight(); Lighting(); CreateTexture(Properties.Resources._1); CreateTexture(Properties.Resources._2); CreateTexture(Properties.Resources._3); CreateTexture(Properties.Resources._4); CreateTexture(Properties.Resources._5); CreateTexture(Properties.Resources._6); glControl.Refresh(); } List<int> Textures = new List<int>(); void CreateTexture(Bitmap bmp) { // テクスチャ有効化 GL.Enable(EnableCap.Texture2D); // 領域確保 int texture; GL.GenTextures(1, out texture); Textures.Add(texture); // アクティブ設定 GL.BindTexture(TextureTarget.Texture2D, texture); System.Drawing.Imaging.BitmapData data = bmp.LockBits( new Rectangle(0, 0, bmp.Width, bmp.Height), // 画像全体をロック System.Drawing.Imaging.ImageLockMode.ReadOnly, // 読み取り専用 System.Drawing.Imaging.PixelFormat.Format24bppRgb); // ロックをしたら必ずアンロックする bmp.UnlockBits(data); // テクスチャ領域にピクセルデータを貼り付ける GL.TexImage2D( TextureTarget.Texture2D, 0, PixelInternalFormat.Rgb, data.Width, data.Height, 0, PixelFormat.Bgr, // Rgbaにすると赤と青が反転するので注意 PixelType.UnsignedByte, data.Scan0); GL.GenerateMipmap(GenerateMipmapTarget.Texture2D); } } |
あとは描画するだけです。
|
1 2 3 4 5 6 7 8 9 10 11 12 13 14 15 16 17 18 19 20 21 22 23 24 25 26 27 28 29 30 31 32 33 34 35 36 37 38 39 40 41 42 43 44 45 46 47 48 49 50 51 52 53 54 55 56 57 58 59 60 61 62 63 64 65 66 67 68 69 70 71 72 73 74 75 76 77 78 79 80 81 82 83 84 85 86 87 88 89 90 91 92 93 94 95 96 97 98 99 100 101 102 103 104 105 106 107 108 109 110 111 112 113 114 115 116 117 118 119 120 121 122 123 124 125 126 127 128 129 130 131 132 133 |
public partial class Form1 : Form { private void glControlEx1_Paint(object sender, PaintEventArgs e) { GL.Clear(ClearBufferMask.ColorBufferBit | ClearBufferMask.DepthBufferBit); // 視点を変更する SetSight(EyeX, EyeY, EyeZ); // サイコロを描画 DrawDice(X, Y, Z, RotateX, RotateY, RotateZ); Lighting(); glControl.SwapBuffers(); } private void DrawDice(double x, double y, double z, double rotateX, double rotateY, double rotateZ) { GL.PushMatrix(); { GL.Translate(x, y, z); GL.Rotate(rotateX, 1, 0, 0); GL.Rotate(rotateY, 0, 1, 0); GL.Rotate(rotateZ, 0, 0, 1); DrawDice0(1); } GL.PopMatrix(); } private void DrawDice0(double size) { double w = size / 2, h = size / 2, d = size / 2; GL.Material(MaterialFace.Front, MaterialParameter.Ambient, Color.White); // 手前の面(1) GL.BindTexture(TextureTarget.Texture2D, Textures[0]); GL.Begin(BeginMode.TriangleStrip); { GL.Normal3(Vector3.UnitZ); GL.TexCoord2(0, 0); GL.Vertex3(w, h, d); GL.TexCoord2(1, 0); GL.Vertex3(-w, h, d); GL.TexCoord2(0, 1); GL.Vertex3(w, -h, d); GL.TexCoord2(1, 1); GL.Vertex3(-w, -h, d); } GL.End(); // 奥の面(6) GL.BindTexture(TextureTarget.Texture2D, Textures[5]); GL.Begin(BeginMode.TriangleStrip); { GL.Normal3(-Vector3.UnitZ); GL.TexCoord2(0, 0); GL.Vertex3(w, -h, -d); GL.TexCoord2(1, 0); GL.Vertex3(-w, -h, -d); GL.TexCoord2(0, 1); GL.Vertex3(w, h, -d); GL.TexCoord2(1, 1); GL.Vertex3(-w, h, -d); } GL.End(); // 右面(2) GL.BindTexture(TextureTarget.Texture2D, Textures[1]); GL.Begin(BeginMode.TriangleStrip); { GL.Normal3(Vector3.UnitX); GL.TexCoord2(0, 0); GL.Vertex3(w, h, -d); GL.TexCoord2(1, 0); GL.Vertex3(w, h, d); GL.TexCoord2(0, 1); GL.Vertex3(w, -h, -d); GL.TexCoord2(1, 1); GL.Vertex3(w, -h, d); } GL.End(); // 左面(5) GL.BindTexture(TextureTarget.Texture2D, Textures[4]); GL.Begin(BeginMode.TriangleStrip); { GL.Normal3(-Vector3.UnitX); GL.TexCoord2(0, 0); GL.Vertex3(-w, -h, -d); GL.TexCoord2(1, 0); GL.Vertex3(-w, -h, d); GL.TexCoord2(0, 1); GL.Vertex3(-w, h, -d); GL.TexCoord2(1, 1); GL.Vertex3(-w, h, d); } GL.End(); // 上面(3) GL.BindTexture(TextureTarget.Texture2D, Textures[2]); GL.Begin(BeginMode.TriangleStrip); { GL.Normal3(Vector3.UnitY); GL.TexCoord2(0, 0); GL.Vertex3(w, h, -d); GL.TexCoord2(1, 0); GL.Vertex3(-w, h, -d); GL.TexCoord2(0, 1); GL.Vertex3(w, h, d); GL.TexCoord2(1, 1); GL.Vertex3(-w, h, d); } GL.End(); // 下面(4) GL.BindTexture(TextureTarget.Texture2D, Textures[3]); GL.Begin(BeginMode.TriangleStrip); { GL.Normal3(-Vector3.UnitY); GL.TexCoord2(0, 0); GL.Vertex3(-w, -h, d); GL.TexCoord2(1, 0); GL.Vertex3(-w, -h, -d); GL.TexCoord2(0, 1); GL.Vertex3(w, -h, d); GL.TexCoord2(1, 1); GL.Vertex3(w, -h, -d); } GL.End(); } } |

こんにちは。
openTKで3Dオブジェクトの表面にテクスチャーを貼り付ける実験をしているのですが、あらゆる方法を試しましたが成功しません。
管理人様のサイトも拝見しましたが、 GL.Beginを使っており、openTKでは非対応で使えません。
https://lets-csharp.com/draw-dice/
現代的にVBOを使用したテクスチャーを貼り付けるサンプルプログラムを作成していただけませんか。
報酬は払います。お見積もりをお願いします。
Visual Studio 2019,Windows7,VB.net,WPF,openTK という環境になります。