JavaScriptで残像を描画するにはどうすればよいでしょうか?
準備
以下のコードでcanvasとボタンを表示させるところまで作ります。
|
1 2 3 4 5 6 7 8 9 10 11 12 13 14 |
<!DOCTYPE html> <html lang="ja"> <head> <meta charset="UTF-8"> <title>鳩でもわかる残像</title> <meta name = "viewport" content = "width=device-width, initial-scale = 1.0"> </head> <body> <script src= "./index.js"></script> </body> </html> |
index.js
|
1 2 3 4 5 6 7 8 9 10 11 12 13 14 15 16 17 18 19 20 21 22 23 24 25 26 27 28 29 30 31 32 33 34 35 36 37 38 39 40 41 42 43 44 45 46 47 48 49 50 51 52 53 54 55 56 57 58 59 60 61 62 63 64 65 66 |
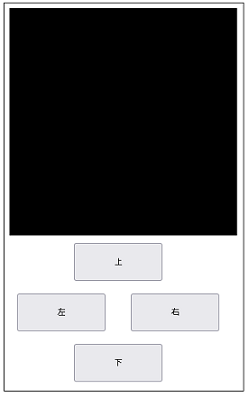
const CANVAS_WIDTH = 360; const CANVAS_HEIGHT = 360; const $canvas = document.createElement('canvas'); const ctx = $canvas.getContext('2d'); // 移動のためのボタンが押下されているか? let moveUp = false; let moveDown = false; let moveLeft = false; let moveRight = false; // イベントリスナ(ボタンが押されたらフラグをセット、離されたらクリアする) function onPressUpButton(press){ moveUp = press ? true : false; } function onPressDownButton(press){ moveDown = press ? true : false; } function onPressLeftButton(press){ moveLeft = press ? true : false; } function onPressRightButton(press){ moveRight = press ? true : false; } // ボタンの初期化(絶対配置 サイズとボタンに表示される文字、追加するイベントリスナもここで指定する) function initButton($button, text, x, y, mouseDown, mouseUp){ $button.innerText = text; $button.style.width = '140px'; $button.style.height = '60px'; $button.style.position = 'absolute'; $button.style.left = x + 'px'; $button.style.top = y + 'px'; $button.addEventListener('mousedown', mouseDown); $button.addEventListener('mouseup', mouseUp); $button.addEventListener('touchstart', mouseDown); $button.addEventListener('touchstart', (ev) => ev.preventDefault()); $button.addEventListener('touchend', mouseUp); document.body.appendChild($button); } window.onload = () => { document.body.appendChild($canvas); $canvas.width = CANVAS_WIDTH; $canvas.height = CANVAS_HEIGHT; ctx.fillStyle = '#000'; ctx.fillRect(0, 0, CANVAS_WIDTH, CANVAS_HEIGHT); initButton(document.createElement('button'), '上', 110, CANVAS_HEIGHT + 20, () => onPressUpButton(true), () => onPressUpButton(false)); initButton(document.createElement('button'), '左', 20, CANVAS_HEIGHT + 20 + 80 * 1, () => onPressLeftButton(true), () => onPressLeftButton(false)); initButton(document.createElement('button'), '右',200 , CANVAS_HEIGHT + 20 + 80 * 1, () => onPressRightButton(true), () => onPressRightButton(false)); initButton(document.createElement('button'), '下', 110, CANVAS_HEIGHT + 20 + 80 * 2, () => onPressDownButton(true), () => onPressDownButton(false)); document.onmouseup = () => { moveUp = false; moveDown = false; moveLeft = false; moveRight = false; } update(); // 後述 } |
更新時に薄い背景色で全体を塗りつぶす方法
問題はここからです。残像を描画する方法として更新時に薄い背景色で全体を塗りつぶす方法があります。この方法だと更新処理が繰り返されるたびに、前に描画されたものは背景色によってだんだん見えなくなります。
|
1 2 3 4 5 6 7 8 9 10 11 12 13 14 15 16 17 18 19 20 21 |
let x = 0; let y = 0; function update(){ requestAnimationFrame(update); ctx.fillStyle = 'rgba(0, 0, 0, 0.05)'; ctx.fillRect(0, 0, CANVAS_WIDTH, CANVAS_HEIGHT); if(moveUp) y--; if(moveDown) y++; if(moveLeft) x--; if(moveRight) x++; ctx.fillStyle = '#ff0'; ctx.fillRect(x, y, 32, 32); } |
ただ、問題点もあります。ctx.fillStyle = ‘rgba(0, 0, 0, 0.05)’;としていますが、0.05の部分の値が大きすぎると残像がすぐに消えてしまうし、小さすぎるとなかなか消えてくれません。いつまでたっても残像が消えないというのはこれはこれで困ります。
また残像を残したいものと残したくないものが混在する場合も困ります。その場合はcanvasをふたつ生成するなどの工夫が必要です。
移動するときに前の座標を記録する
ふたつめの方法は移動するときに前の座標を記録しておき、これを薄く描画するという方法です。
Playerクラスを定義して、移動したら前の座標をMaxHistory件分配列のなかに保存しておきます。
|
1 2 3 4 5 6 7 8 9 10 11 12 13 14 15 16 17 18 19 20 21 22 23 24 25 26 27 28 29 30 31 32 33 34 35 36 37 |
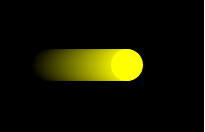
class Player{ constructor(){ this.X = undefined; this.Y = undefined; this.HistoryX = []; this.HistoryY = []; this.MaxHistory = 80; } Move(x, y){ if(this.X != undefined){ this.HistoryX.unshift(this.X); this.HistoryY.unshift(this.Y); } if(this.HistoryX.length > this.MaxHistory){ this.HistoryX.length = this.MaxHistory; this.HistoryY.length = this.MaxHistory; } this.X = x; this.Y = y; } Draw(){ // 古いものから順に描画する for(let i = this.HistoryX.length - 1; i >= 0 ; i--){ const a = 0.9 * (1 - i / this.MaxHistory); ctx.fillStyle = `rgba(255, 255, 0, ${a})`; ctx.beginPath(); ctx.arc(this.HistoryX[i], this.HistoryY[i], 16, 0, Math.PI * 2); ctx.fill(); } ctx.fillStyle = 'rgb(255, 255, 0)'; ctx.beginPath(); ctx.arc(this.X, this.Y, 16, 0, Math.PI * 2); ctx.fill(); } } |
あとはPlayerクラスのインスタンスを生成してMove関数とDraw関数を呼び出します。
|
1 2 3 4 5 6 7 8 9 10 11 12 13 14 15 16 17 18 19 20 21 22 |
let x = 0; let y = 0; const player = new Player(); function update(){ requestAnimationFrame(update); ctx.fillStyle = '#000'; ctx.fillRect(0, 0, CANVAS_WIDTH, CANVAS_HEIGHT); if(moveUp) y--; if(moveDown) y++; if(moveLeft) x--; if(moveRight) x++; player.Move(x, y); player.Draw(); } |
この方法もあまりうまくいきません。古いものから順に、つまり不透明度(opacity)が低い順に描画していったとしても何度も描画が繰り返されることで濃くなってしまい残像のように見えなくなってしまうのです。
改善策
そこでopacityが設定された色と背景色が合成された色を求めてから残像を古いものから順に描画していくことにします。それが以下のコードです。PlayerクラスのDraw関数を修正します。
|
1 2 3 4 5 6 7 8 9 10 11 12 13 14 15 16 17 18 19 20 21 |
class Player{ Draw(){ for(let i = this.HistoryX.length - 1; i >= 0 ; i--){ const a = 0.9 * (1 - i / this.MaxHistory); ctx.fillStyle = this.GetRgbFromRgba(255, 255, 0, a, 0, 0, 0); ctx.beginPath(); ctx.arc(this.HistoryX[i], this.HistoryY[i], 16, 0, Math.PI * 2); ctx.fill(); } ctx.fillStyle = 'rgb(255, 255, 0)'; ctx.beginPath(); ctx.arc(this.X, this.Y, 16, 0, Math.PI * 2); ctx.fill(); } GetRgbFromRgba(frontR, frontG, frontB, frontA, backR, backG, backB){ const retR = (frontR / 255 * frontA + backR / 255 * (1 - frontA)) * 255; const retG = (frontG / 255 * frontA + backG / 255 * (1 - frontA)) * 255; const retB = (frontB / 255 * frontA + backB / 255 * (1 - frontA)) * 255; return `rgb(${Math.round(retR)}, ${Math.round(retG)}, ${Math.round(retB)})`; } } |
ところで背景色にrgbaで透明度を含めて表現される色をrgbに変換するためにはどうすればよいでしょうか?
まず前景色と背景色のRGB成分をそれぞれ [0, 1] の範囲に正規化します。RGB成分は[0, 255]なので255で割ればよいです。次に(1 – アルファ値) * 背景色のRGB成分 + アルファ値 * RGBA色のRGB成分を計算します。最後に結果をもとの [0, 255] の範囲に戻すために255倍して四捨五入します。
