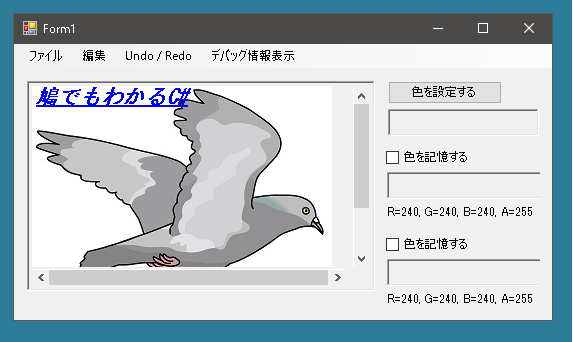
今回は簡易画像編集ソフトに文字を描画する機能を追加します。
[文字を挿入する]を選択したらダイアログを表示し、確定したら左上を起点に文字列を挿入します。このままではあまり役に立たないのですが、今後改良を加えます。
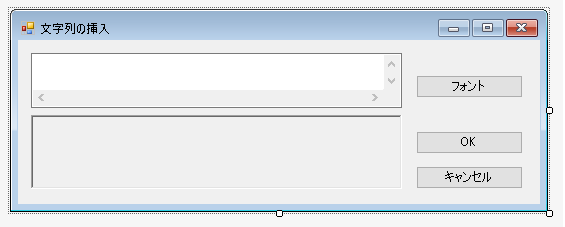
では文字列挿入のためのダイアログを表示させます。

上側にあるのがテキストボックス(複数行入力可)、下側にあるのはピクチャーボックスです。フォントボタンをおすとフォントを変更することができます。
このダイアログでは描画させたい文字列、文字列のフォント、色を設定します。
|
1 2 3 4 5 6 7 8 9 10 11 12 13 14 15 16 17 18 19 20 21 22 |
public partial class InsertStringForm : Form { public string String = ""; public Color Color = Color.Black; public Font StringFont = null; public InsertStringForm() { InitializeComponent(); buttonOK.DialogResult = DialogResult.OK; buttonCancel.DialogResult = DialogResult.Cancel; textBox1.TextChanged += TextBox1_TextChanged; buttonFont.Click += ButtonFont_Click; } protected override void OnLoad(EventArgs e) { StringFont = Font; } } |
[フォント]ボタンがクリックするとフォント設定をするためのFontDialogが現れます。そして[OK]がクリックされた場合はフォントと色が設定されます。またダイアログ下のピクチャーボックスには設定した文字列がどのように描画されるかも表示されます。
|
1 2 3 4 5 6 7 8 9 10 11 12 13 14 15 16 17 18 19 20 21 22 23 |
public partial class InsertStringForm : Form { private void ButtonFont_Click(object sender, EventArgs e) { FontDialog dlg = new FontDialog(); dlg.ShowColor = true; if(dlg.ShowDialog() == DialogResult.OK) { Bitmap bitmap = new Bitmap(pictureBox1.Width, pictureBox1.Height); Graphics g = Graphics.FromImage(bitmap); String = textBox1.Text; Color = dlg.Color; StringFont = dlg.Font; g.DrawString(String, StringFont, new SolidBrush(Color), new Point(0, 0)); g.Dispose(); if(pictureBox1.Image != null) pictureBox1.Image.Dispose(); pictureBox1.Image = bitmap; } dlg.Dispose(); } } |
テキストボックスの文字列が変更されると現在設定されているフォントから文字列がどのように描画されるか確認することができます。
|
1 2 3 4 5 6 7 8 9 10 11 12 13 14 15 |
public partial class InsertStringForm : Form { private void TextBox1_TextChanged(object sender, EventArgs e) { Bitmap bitmap = new Bitmap(pictureBox1.Width, pictureBox1.Height); Graphics g = Graphics.FromImage(bitmap); String = textBox1.Text; g.DrawString(String, StringFont, new SolidBrush(Color), new Point(0, 0)); g.Dispose(); if(pictureBox1.Image != null) pictureBox1.Image.Dispose(); pictureBox1.Image = bitmap; } } |
メインフォームでメニューが選択されると、上記で作成したクラスから生成されたダイアログが表示されます。適切な設定をして[OK]ボタンをおすと文字列が画像のなかに挿入されます。
|
1 2 3 4 5 6 7 8 9 10 11 12 13 14 15 16 17 18 19 20 21 22 23 |
public partial class Form1 : Form { private void InsertStringMenuItem_Click(object sender, EventArgs e) { InsertStringForm form = new InsertStringForm(); if(form.ShowDialog() == DialogResult.OK && form.String != "") { Bitmap bitmap = userControlImage1.Bitmap; if(bitmap != null) { string str = form.String; Font font = form.StringFont; Point point = new Point(0, 0); Color color = form.Color; bool ret = userControlImage1.InsertString(str, font, color, point); if(!ret) MessageBox.Show("画像が読み込まれていないか文字列が設定されていません", "エラー", MessageBoxButtons.OK, MessageBoxIcon.Error); } } form.Dispose(); } } |
実際に文字を描画するにはUserControlImageクラスのInsertStringメソッドで以下のような処理をおこないます。
|
1 2 3 4 5 6 7 8 9 10 11 12 13 14 15 16 17 18 19 20 21 22 23 24 25 26 27 28 29 |
public partial class UserControlImage : UserControl { public bool InsertString(string str, Font font, Color color, Point point) { if(Bitmap == null) return false; if(str == "") return false; // 文字列が描画される矩形を求める Rectangle rect = GetStringRectangle(str, font, point); Bitmap stringBitmap = new Bitmap(rect.Width, rect.Height); Graphics g = Graphics.FromImage(stringBitmap); g.DrawString(str, font, new SolidBrush(color), point); g.Dispose(); BitmapRectangle = new BitmapRectangle(stringBitmap, rect); Bitmap newBitmap = new Bitmap(Bitmap); g = Graphics.FromImage(newBitmap); g.DrawImage(stringBitmap, new Point(rect.X, rect.Y)); Bitmap = newBitmap; ShowBitmap(DrawBoderRectangle(Bitmap)); return true; } } |
このままではあまり便利とはいえません。文字列が挿入される場所を固定しないで移動できるようにするにはどうすればいいのでしょうか?
