ML.NET CLI を使用して分類モデルを作成したあと感情分析する の続きです。今回はASP.NET Coreでアプリを作成して、サーバー上で日本語感情分析のアプリを動作させます。またAPIも公開してみることにします。
以前、Pythonのライブラリを使って日本語文章の感情分析APIを作成しました。
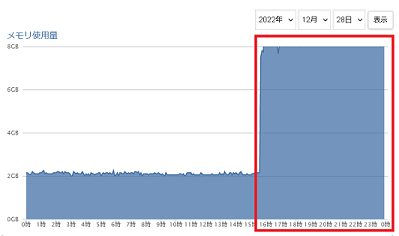
ところがサーバー上で動かしてみるとけっこうメモリーをドカ食いしてくれます。

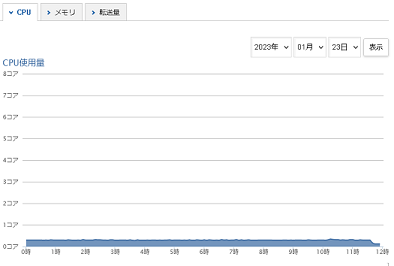
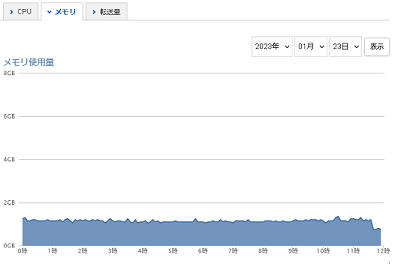
そのためサーバー上で公開するのは断念することになりました。ASP.NET Core版だとそんなにひどいことにはなりません。もっともPythonのライブラリとではぜんぜんアルゴリズムが違うので単純な比較はできないのですが・・・。


いつもとほとんどかわりありません。
Contents
cshtml部分
それでは作成することにします。名前空間は SentimentAnalysis とします。
まずNuGetでMicrosoft.MLをインストールします。そして前回の記事で生成したSampleClassification.zipというファイルをModelDataフォルダのなかにコピーします。プロパティの出力ディレクトリにコピーを「常にコピーする」に変更します。
Pagesフォルダのなかにsentiment-analysisフォルダをつくります。
Pages\sentiment-analysis\Index.cshtml
|
1 2 3 4 5 6 7 8 9 10 11 12 13 14 15 16 17 18 19 20 21 22 23 24 25 26 27 28 29 30 31 32 33 34 35 36 37 38 39 40 41 42 43 44 45 46 47 48 49 50 51 52 53 54 55 56 57 58 59 60 61 62 63 64 65 66 67 68 |
@page @model SentimentAnalysis.IndexModel @{ Layout = null; } <!DOCTYPE html> <html lang="ja"> <head> <meta charset="utf-8" /> <meta name="viewport" content="width=device-width, initial-scale=1.0" /> <title>鳩でもわかる感情分析 ASP.NET Core</title> </head> <body> <div id="container"> <div class="text-center"> <h1 class="display-4">感情分析</h1> </div> <form method="post"> <div> <textarea asp-for="InputText" id="text" cols="50" rows="10" value=""></textarea> </div> <input class="button" type="submit" value="送信" /> <button class="button" onclick="Clear()">クリア</button> </form> @if (Model.PredictResult != null) { Model.InputText = ""; <p>判定結果</p> <pre>@Model.PredictResult.Sentence</pre> <!-- preタグをいれないと改行が反映されない --> if (Model.PredictResult.PredictedLabel == 1) { <p>ポジティブ</p> } if (Model.PredictResult.PredictedLabel == -1) { <p>ネガティブ</p> } if (Model.PredictResult.PredictedLabel == 0) { <p>ニュートラル</p> } var positive = Model.PredictResult.Score[1] * 100; var negative = Model.PredictResult.Score[0] * 100; var neutral = Model.PredictResult.Score[2] * 100; <table> <tr><td>ポジティブ</td><td>@positive %</td></tr> <tr><td>ネガティブ</td><td>@negative %</td></tr> <tr><td>ニュートラル</td><td>@neutral %</td></tr> </table> } </div><!-- /#container --> <script> function Clear() { document.getElementById('text').value = ""; } </script> </body> </html> |
ポジティブ、ネガティブ、ニュートラルの要素がどれだけあるかを表示させる部分ですが、Score配列の要素を1,0,2の順で取得しています。
|
1 2 3 |
var positive = Model.PredictResult.Score[1] * 100; var negative = Model.PredictResult.Score[0] * 100; var neutral = Model.PredictResult.Score[2] * 100; |
これはトレーニングに使った学習セットの最初の部分がネガティブ、ポジティブ、ニュートラルの順になっていたからです。
|
1 2 3 |
ぼけっとしてたらこんな時間。チャリあるから食べにでたいのに… -1 今日の月も白くて明るい。昨日より雲が少なくてキレイな~ と立ち止まる帰り道。チャリなし生活も悪くない。 1 早寝するつもりが飲み物がなくなりコンビニへ。ん、今日、風が涼しいな。 0 |
C#でコードを書く
Index.cshtml.csにコードを記述します。
ModelInputOutputクラスの定義
最初にSentimentModelInputクラスとSentimentModelOutputクラスを定義します。
Pages\sentiment-analysis\Index.cshtml.cs
|
1 2 3 4 5 6 7 8 9 10 11 12 13 14 15 16 17 18 19 20 21 22 23 24 25 26 27 28 29 30 |
using Microsoft.AspNetCore.Mvc; using Microsoft.AspNetCore.Mvc.RazorPages; using Microsoft.ML; using Microsoft.ML.Data; namespace SentimentAnalysis { public class SentimentModelInput { [LoadColumn(0)] [ColumnName(@"col0")] public string Col0 { get; set; } [LoadColumn(1)] [ColumnName(@"col1")] public float Col1 { get; set; } } public class SentimentModelOutput { public string Sentence { get; set; } [ColumnName(@"PredictedLabel")] public float PredictedLabel { get; set; } [ColumnName(@"Score")] public float[] Score { get; set; } } } |
感情分析の処理ですが、これは前回の ML.NET CLI を使用して分類モデルを作成したあと感情分析する とほとんど同じです。
Pages\sentiment-analysis\Index.cshtml.cs
|
1 2 3 4 5 6 7 8 9 10 11 12 13 14 15 16 17 18 19 20 21 22 23 24 25 26 27 28 29 30 31 32 33 34 35 36 37 38 39 40 41 42 43 44 45 46 47 48 49 50 51 52 53 54 |
namespace SentimentAnalysis { public class IndexModel : PageModel { private readonly ILogger<IndexModel> _logger; public IndexModel(ILogger<IndexModel> logger) { _logger = logger; InputText = ""; } [BindProperty] public string InputText { get; set; } public SentimentModelOutput? PredictResult = null; public void OnPost() { if (InputText == null || InputText == "") return; SentimentModelInput sampleData = new SentimentModelInput() { Col0 = InputText, }; PredictResult = Predict(sampleData); PredictResult.Sentence = InputText; } public void OnGet() { } private static string MLNetModelPath = Path.GetFullPath("./ModelData/SampleClassification.zip"); public static readonly Lazy<PredictionEngine<SentimentModelInput, SentimentModelOutput>> PredictEngine = new Lazy<PredictionEngine<SentimentModelInput, SentimentModelOutput>>(() => CreatePredictEngine(), true); private static PredictionEngine<SentimentModelInput, SentimentModelOutput> CreatePredictEngine() { var mlContext = new MLContext(); ITransformer mlModel = mlContext.Model.Load(MLNetModelPath, out var _); return mlContext.Model.CreatePredictionEngine<SentimentModelInput, SentimentModelOutput>(mlModel); } public static SentimentModelOutput Predict(SentimentModelInput input) { var predEngine = PredictEngine.Value; return predEngine.Predict(input); } } } |
日本語感情分析のAPIを公開する
次にAPIを公開して外部から実行できるようにします。ただしセキュリティ上、本当に無制限に利用されては困るので、自分のサイト内からだけリクエストを受け付けるように制限します。
以下はプロジェクトを作成したときに自動生成されるProgram.csに変更を加えたコードです。追加したのは3箇所だけです。
Program.cs
|
1 2 3 4 5 6 7 8 9 10 11 12 13 14 15 16 17 18 19 20 21 22 23 24 25 26 27 28 29 30 31 |
var builder = WebApplication.CreateBuilder(args); // 追加 (1) builder.Services.AddCors(options => { options.AddPolicy(name: "Origins", policy => { policy.WithOrigins("https://lets-csharp.com").AllowAnyHeader(); }); }); builder.Services.AddRazorPages(); var app = builder.Build(); app.UseCors("Origins"); // 追加 (2) if (!app.Environment.IsDevelopment()) { app.UseExceptionHandler("/Error"); } app.UseStaticFiles(); app.UseRouting(); app.UseAuthorization(); app.MapRazorPages(); SentimentAnalysis.IndexModel.MapPostSentimentAnalysisApi(app); // 追加 (3) app.Run(); |
API実装に必要なクラスの定義
SentimentAnalysis.IndexModelクラスにMapPostSentimentAnalysisApiメソッドを追加していますが、その前提として先に必要なクラスを定義しておきます。
|
1 2 3 4 5 6 7 8 9 10 11 12 13 14 15 16 17 18 |
namespace SentimentAnalysis { class SentimentRequestBody { public string Sentence { get; set; } } public class SentimentResponse { public bool OK { get; set; } public string Sentence { get; set; } public string Label { get; set; } public float PositiveScore { get; set; } public float NegativeScore { get; set; } public float NeutralScore { get; set; } } } |
Postされたらjsonデータを返す
MapPostSentimentAnalysisApiメソッドをを示します。
|
1 2 3 4 5 6 7 8 9 10 11 12 13 14 15 16 17 18 19 20 21 22 23 24 25 26 27 28 29 30 31 32 33 34 35 36 37 38 39 40 41 42 43 44 |
namespace SentimentAnalysis { public class IndexModel : PageModel { public static void MapPostSentimentAnalysisApi(WebApplication app) { app.MapPost("/sentiment-analysis-api", (SentimentRequestBody body) => { if (body.Sentence == null || body.Sentence == "") { return Results.Ok(new SentimentResponse { OK = false, Sentence = "", }); } SentimentModelInput input = new SentimentModelInput() { Col0 = body.Sentence, }; SentimentModelOutput output = Predict(input); string label = ""; if (output.PredictedLabel == 1) label = "Positive"; if (output.PredictedLabel == -1) label = "Negative"; if (output.PredictedLabel == 0) label = "Neutral"; return Results.Ok(new SentimentResponse { OK = true, Sentence = body.Sentence, Label = label, PositiveScore = output.Score[1], NegativeScore = output.Score[0], NeutralScore = output.Score[2], }); }); } } } |
HTML部分
次にHTMLファイルを作成してサイト内にアップロードします。
|
1 2 3 4 5 6 7 8 9 10 11 12 13 14 15 16 17 18 19 20 21 22 23 24 25 26 27 28 29 |
<!DOCTYPE html> <html lang="ja"> <head> <meta charset="UTF-8"> <title>鳩でもわかる日本語感情分析API</title> <meta http-equiv="X-UA-Compatible" content="IE=edge"> <meta name="viewport" content="width=device-width, initial-scale=1.0"> </head> <body> <div id = "container"> <p>自作APIで日本語感情分析をおこないます。</p> <div><textarea id="text" rows="10" cols="50"></textarea></div> <div> <button type="button" class ="button" onclick="OnClick()">解析</button> <button type="button" class ="button" onclick="Clear()">クリア</button> </div> <div id="result"> </div> </div> <script src="https://ajax.googleapis.com/ajax/libs/jquery/1.9.1/jquery.min.js"></script> <script src=".app.js"></script> </body> </html> |
JavaScript部分
クリックされたらエンドポイントにjsonデータを送ります。
app.js
|
1 2 3 4 5 6 7 8 9 10 11 12 13 14 15 16 17 18 19 20 21 22 23 |
function OnClick(){ let text = document.getElementById('text').value; let obj = { "sentence":text } var json_text = JSON.stringify(obj); jQuery.ajax({ type:"post", url:"http://localhost:5000/sentiment-analysis-api/", // POST送信先のURL data:json_text, // JSONデータ本体 contentType: 'application/json', // リクエストの Content-Type dataType: "json", // レスポンスをJSONとしてパースする success: function(data) { // 200 OK時 ShowResult(data); // 自作関数(後述) }, error: function() { // HTTPエラー時 alert("失敗:Server Error."); } }); } |
APIからレスポンスが返されたら結果を表示します。< と > はエスケープして改行を反映させるために’\n’は'<br>’に置き換えています。
|
1 2 3 4 5 6 7 8 9 10 11 12 13 14 15 16 17 18 19 20 21 22 23 24 25 |
function ShowResult(result){ document.getElementById('result').innerText = ''; let html = ""; if(result.ok){ // 成功時 let sentence = result.sentence; sentence = sentence.split('<').join('<'); sentence = sentence.split('>').join('>'); sentence = sentence.split('\n').join('<br>'); html = `<div>文:<br>${sentence}</div> <p>判定結果:${result.label}</p> <table> <tr><td>ポジティブ</td><td>${Round(result.positiveScore * 100, 2)} %</td></tr> <tr><td>ネガティブ</td><td>${Round(result.negativeScore * 100, 2)} %</td></tr> <tr><td>ニュートラル</td><td>${Round(result.neutralScore * 100, 2)} %</td></tr> </table>`; } else // 失敗時 html = "エラー"; document.getElementById('result').innerHTML = html; } |
小数点以下が長々と表示されることがあるので四捨五入して小数点第二位までを表示させるための自作関数です。
|
1 2 3 4 |
// 四捨五入して小数点以下n位までのみ表示 function Round(val, n){ return Math.floor( val * Math.pow( 10, n ) ) / Math.pow( 10, n ) ; } |
[クリア]ボタンがクリックされたらテキストエリアの文字列を消去します。
|
1 2 3 4 |
function Clear(){ document.getElementById('text').value = ''; document.getElementById('result').innerText = ''; } |
