で作成したスクリーンセーバーは表示される画像はMyPicturesフォルダだけでしたが、他の場所を選択したくなるかもしれません。画像を切り替える速度を変更したくなるかもしれません。そこで自分で設定できるものにします。
ではスクリーンセーバーの設定をするためにはどうすればよいのでしょうか。ここを参考にしました。
上記ページによるとMainメソッドを変更すれば可能であることがわかります。
|
1 2 3 4 5 6 7 8 9 10 11 12 13 14 15 16 17 18 19 20 21 22 23 24 25 26 27 |
static class Program { [STAThread] static void Main(string[] args) { if(args.Length > 0) { if(args[0].ToLower().Trim().Substring(0, 2) == "/s") //show { // スクリーンセーバーを表示 } else if(args[0].ToLower().Trim().Substring(0, 2) == "/p") //preview { // プレビュー画面を表示 } else if(args[0].ToLower().Trim().Substring(0, 2) == "/c") //configure { // スクリーンセーバーのオプション表示 } } else { // 引数なしの場合。これはユーザーがファイルを右クリックして //「構成」を選んだときに発生します。通常はオプションフォームを表示します。 } } } |
では前回のプログラムを修正します。
まず設定を保存するためのクラス Config をつくります。設定を保存する場所は
C:\Users\<ユーザー名>\AppData\Roaming\<CompanyName>\<ProductName>\<ProductVersion>
になります。またファイル名は、config-<Guid>.xmlになります。
プログラムが開始されたら設定が保存されているファイルがあるかどうか調べます。なかったら画像の切り替えは2秒おき、画像ファイルはMyPictureフォルダとなります。設定が保存されているファイルがみつかったらこれを読み込み、Configオブジェクトをつくります。
あとはスクリーンセーバーを起動するのであれば Application.Run(new ScreenSaverWindow(config));、スクリーンセーバーのオプション表示をするのであれば Application.Run(new ConfigForm(config));を実行します。
|
1 2 3 4 5 6 7 8 9 10 11 12 13 14 15 16 17 18 19 20 21 22 23 24 25 26 27 28 29 30 31 32 33 34 35 36 37 38 39 40 41 42 43 44 45 46 47 48 49 50 51 52 53 54 55 56 57 58 59 60 61 62 63 64 65 66 67 68 69 |
using System; using System.Windows.Forms; using System.Xml.Serialization; using System.IO; using System.Runtime.InteropServices; using System.Reflection; public class Config { static public string GetConfigPath() { GuidAttribute hogeAttribute = (GuidAttribute)Attribute.GetCustomAttribute(Assembly.GetExecutingAssembly(), typeof(GuidAttribute)); return Application.UserAppDataPath + "\\config-" + hogeAttribute.Value + ".xml"; return Application.CommonAppDataPath + "\\config-" + hogeAttribute.Value + ".xml"; } public int Interval = 0; public string PictureFolderPath = ""; } static class Program { [STAThread] static void Main(string[] args) { Config config = null; if(System.IO.File.Exists(Config.GetConfigPath())) { XmlSerializer xml = new XmlSerializer(typeof(Config)); StreamReader sr = new StreamReader(Config.GetConfigPath()); config = (Config)xml.Deserialize(sr); sr.Close(); } else { config = new Config(); config.Interval = 2; config.PictureFolderPath = System.Environment.GetFolderPath(Environment.SpecialFolder.MyPictures); } Application.EnableVisualStyles(); Application.SetCompatibleTextRenderingDefault(false); if(args.Length > 0) { if(args[0].ToLower().Trim().Substring(0, 2) == "/s") //show { // スクリーンセーバーを表示 Application.Run(new ScreenSaverWindow(config)); } else if(args[0].ToLower().Trim().Substring(0, 2) == "/p") //preview { // プレビュー画面を表示 } else if(args[0].ToLower().Trim().Substring(0, 2) == "/c") //configure { // スクリーンセーバーのオプション表示 Application.Run(new ConfigForm(config)); } } else { // 引数なしの場合。これはユーザーがファイルを右クリックして //「構成」を選んだときに発生します。通常はオプションフォームを表示します。 Application.Run(new ScreenSaverWindow(config)); } } } |
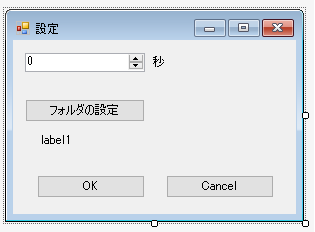
設定のフォームは受け取ったConfigオブジェクトから現在の設定を表示します。[フォルダの設定]がクリックされたらフォルダを選択するダイアログ(FolderBrowserDialog)を表示します。そしてFolderBrowserDialogのOKがクリックされたらフィールド変数PictureFolderPathを変更します。
[OK]がクリックされたら設定をファイルに保存します。[Cancel]がクリックされたら何もしないで終了します。

|
1 2 3 4 5 6 7 8 9 10 11 12 13 14 15 16 17 18 19 20 21 22 23 24 25 26 27 28 29 30 31 32 33 34 35 36 37 38 39 40 41 42 43 44 45 |
public partial class ConfigForm : Form { Config Config = null; string PictureFolderPath = ""; public ConfigForm(Config config) { InitializeComponent(); Config = config; numericUpDown1.Value = Config.Interval; PictureFolderPath = Config.PictureFolderPath; label1.Text = PictureFolderPath; } private void button1_Click(object sender, EventArgs e) { FolderBrowserDialog dialog = new FolderBrowserDialog(); dialog.SelectedPath = PictureFolderPath; if(dialog.ShowDialog() == DialogResult.OK) { PictureFolderPath = dialog.SelectedPath; label1.Text = PictureFolderPath; } dialog.Dispose(); } private void buttonOK_Click(object sender, EventArgs e) { XmlSerializer xml = new XmlSerializer(typeof(Config)); StreamWriter sw = new StreamWriter(Config.GetConfigPath()); Config.Interval = (int)numericUpDown1.Value; Config.PictureFolderPath = PictureFolderPath; xml.Serialize(sw, Config); sw.Close(); Close(); } private void buttonCancel_Click(object sender, EventArgs e) { Close(); } } |
スクリーンセーバーが起動されたら、Configオブジェクトの情報からフィールド変数のChangingPictureIntervalとTargetDirectoryに値をセットします。あとはC#でスクリーンセーバーをつくってみると同じです。
|
1 2 3 4 5 6 7 8 9 10 11 12 13 14 15 16 17 18 19 20 21 22 23 24 25 26 27 28 29 30 31 |
public partial class ScreenSaverWindow : Form { // 表示する画像を切り替える間隔を指定します。単位はミリ秒。 private int ChangingPictureInterval = 100; // 表示したい画像群を含むフォルダを指定します。 private string TargetDirectory = Environment.GetFolderPath(Environment.SpecialFolder.MyPictures); // スクリーンセーバー起動時のマウスポインタの位置を記憶しておく private Point cursorPoint = Cursor.Position; PictureBox pictureBox = new PictureBox(); Timer Timer1 = new Timer(); Random rand = new Random(); List<string> picFiles = new List<string>(); public ScreenSaverWindow(Config config) { this.SuspendLayout(); // 設定どおりの値をセットする ChangingPictureInterval = config.Interval * 1000; TargetDirectory = config.PictureFolderPath; // それ以外は前回と同じ } // その他のメソッドも前回と同じ } |
