Contents
グラフと方程式
突然ですが、方程式 x^2 – 2x – 4 = 0 の解は何でしょうか?
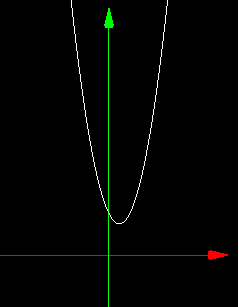
解の公式を使うと解は 1±√5 です。またf(x) = x^2 – 2x – 4 のグラフを書いてみると以下のようになります。
x軸と2箇所で交わっています。これはxの値によっては x^2 – 2x – 4 = 0 になる場合が2つあることを意味していて、そのときのxの値がこの方程式の実数解です。グラフをみるとこの方程式の実数解が2つあることが視覚的にもわかると思います。
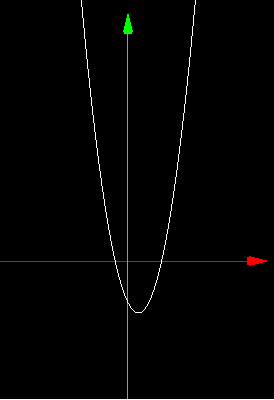
では方程式 x^2 – 2x + 4 = 0 の解はどうなるでしょうか? この場合、実数解は存在しません。判別式(b^2 – 4ac)なんて知らなくても以下のf(x) = x^2 – 2x + 4 のグラフをみてみるとx軸と交わる点は存在しないため、この方程式の実数解は存在しないことが視覚的にも理解できると思います。
複素数と3次元グラフ
問題はここからです。方程式 x^2 – 2x + 4 = 0 には解は存在しないのでしょうか?解が 存在しないのは実数の範囲内という条件があるときです。xが複素数の場合は1±√3iという虚数解が存在します。これを図形的に理解するためには平面上のグラフでは難しいです。
そこで3次元グラフを考えます。赤い軸がxの実部、青い軸がxの虚部、緑の軸がf(x) = x^2 – 2x + 4 の実部です。
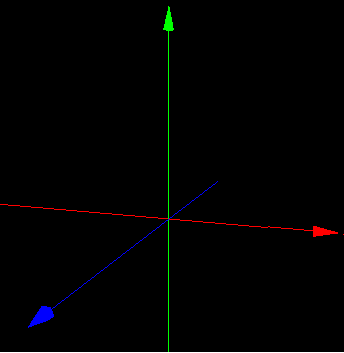
実際にグラフを書こうとするとグラフは線ではなく面になることが予想できます。ただY座標はf(x)の実部なので虚部を図として表現することができません。そこでここではf(x)が実数になる場合のみを考えます。
どのように考えればよいでしょうか? 複素数は a + biです。aとbはそれぞれ実数、iは虚数単位で2乗すると-1になる数です。まずはx^2 – 2x + 4に x = a + bi を代入して計算してみましょう。
x^2 – 2x + 4 = (a + bi)^2 – 2(a + bi) + 4
これを実部と虚部にわけて整理すると (a^2 – b^2 – 2a + 4) + (2ab – 2b)i となります。
f(x)が実数になる場合とはiの係数 2ab – 2b が0になる場合です。
2ab – 2b = 0 の両辺を2で割って因数分解すると b(a – 1) = 0 です。b = 0 または a = 1のときf(x)は実数になるのです。
b = 0とはxが実数なのでf(x)も実数になるのは当たり前だと言われれば当たり前です。重要なのはもうひとつのケース、すなわち実部が1の場合は虚部が何であってもf(x)は実数になるということです。
a^2 – b^2 – 2a + 4 に a = 1 を代入してみましょう。
a^2 – b^2 – 2a + 4 = 1^2 – b^2 – 2 + 4 = – b^2 + 3
実数解が存在しなくても0との交点は存在する?
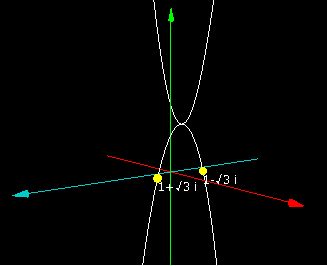
さきほどの3次元座標でグラフを書くと以下のようになります。

これではよくわからないので別の角度から見てみます。
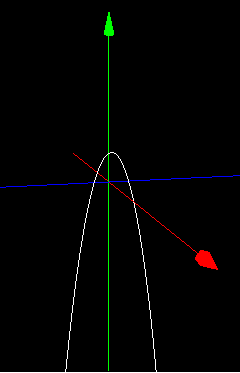
x軸方向からみると(この方向からだとx軸が見えない)、立体感がないかわりにf(x) = 0になる複素数 1 + bi が2つあるということが視覚的にはっきりします。
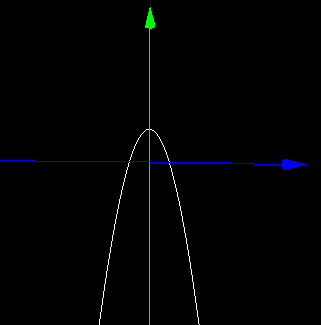
まとめるとf(x) = x^2 – 2x + 4が実数になる場合に限定して3次元グラフを書くと放物線がふたつできることになります。

グラフを見ることができるページをつくったのでマウスをドラッグしていろいろな角度から眺めてみてください。
Three.jsで3次元グラフを書いてみる
JavaScriptのコードも書いておきます。
HTML部分
HTML部分を示します。canvasと方程式の解に相当する座標が表示されるテキストフィールドを2つ用意します。カメラを移動させることで交点のスクリーン座標が変わるので、そのつどテキストフィールドの位置を変更します。
|
1 2 3 4 5 6 7 8 9 10 11 12 13 14 15 16 17 18 19 20 21 |
<!DOCTYPE html> <html> <head> <meta charset="utf-8"> <meta name = "viewport" content = "width=device-width, initial-scale = 1.0"> <title>3D グラフ サンプル</title> <script src="https://unpkg.com/three@0.142.0/build/three.min.js"></script> <script src="https://unpkg.com/three@0.142.0/examples/js/controls/OrbitControls.js"></script> <link rel = "stylesheet" href = "./style.css" type = "text/css" media = "all"> </head> <body> <div id = "container"> <canvas id ="canvas"></canvas> <div id = "tf1" class = "tf"></div><!-- 方程式の解に相当する座標が表示される部分 --> <div id = "tf2" class = "tf"></div><!-- 方程式の解に相当する座標が表示される部分 --> <button id = "auto-rotation" onclick="autoRotation()">自動で回転させる</button> </div> <script src= "./index.js"></script> </body> </html> |
style.css
|
1 2 3 4 5 6 7 8 9 10 11 12 13 14 15 16 17 18 |
#container{ position: relative; } .tf{ position: absolute; background: transparent; color: white; top: 0; left: 0; font-size: 12px; } #auto-rotation{ width: 200px; height: 50px; display: block; } |
グローバル変数と定数
JavaScript部分を示します。
グローバル変数と定数を示します。
index.js
|
1 2 3 4 5 6 7 8 9 10 11 12 13 14 15 16 17 18 19 20 21 22 23 24 25 26 27 28 29 30 31 32 33 34 |
// シーン const scene = new THREE.Scene(); // canvasのサイズ const width = 360; const height = 480; const fov = 60; // カメラの視野角 const aspect = width / height; // アスペクト比 const near = 1; // クリッピングはどこからどこまで? const far = 1000; // カメラの生成 const camera = new THREE.PerspectiveCamera(fov, aspect, near, far); // カメラの手動制御:OrbitControls const controls = new THREE.OrbitControls(camera, document.body); // レンダラー const renderer = new THREE.WebGLRenderer({ canvas: document.getElementById('canvas'), }); // ライト const directionalLight = new THREE.DirectionalLight(0xffffff); // 環境光 const ambient = new THREE.AmbientLight(0x666666); // グラフと面 Y = 0の交点に配置する2つの球体 let sphere1; let sphere2; let rot = 0; // カメラの回転角(度数法) let isAutoRotation = false; // カメラを自動回転させるか? |
ページが読み込まれたときの処理
ページが読み込まれたときの処理を示します。
|
1 2 3 4 5 6 7 8 9 10 11 12 13 14 15 16 17 18 19 20 21 22 23 24 25 |
window.onload = () => { camera.position.set(0, 0, 25); // カメラをセット // レンダラーの設定 renderer.setSize(width, height); renderer.setClearColor(0x000000); // 光源の設定とシーンへの追加 directionalLight.position.set(0, 0.7, 0.7); scene.add(directionalLight); scene.add(ambient); // XYZ軸(矢印)をシーンに追加する(後述) addAxis('x'); addAxis('y'); addAxis('z'); // グラフの曲線を追加する(後述) addGraph(); // Y = 0 の面とグラフの交点に球体を追加する(後述) addIntersection(); render(); // 後述 } |
矢印をシーンに追加する
XYZ軸となる矢印をシーンに追加する処理を示します。
|
1 2 3 4 5 6 7 8 9 10 11 12 13 14 15 16 17 18 19 20 21 22 23 24 25 26 |
function addAxis(xyz){ let axisLength = 16; // 矢印の長さ const axisHeadLength = axisLength * 0.05; // 矢印の頭の長さ const axisHeadWidth = axisHeadLength * 0.5; // 矢印の頭の太さ let direction; // 矢印の向き let start; // 矢印の始点 let color; // 矢印の色 if(xyz == 'x'){ direction = new THREE.Vector3(1, 0, 0); // 矢印の向き(X方向) start = new THREE.Vector3(-axisLength / 2, 0, 0); // 矢印の始点 color = 0xff0000; // 矢印の色 } if(xyz == 'y'){ direction = new THREE.Vector3(0, 1, 0); // 矢印の向き(Y方向) start = new THREE.Vector3(0, -axisLength / 2, 0); // 矢印の始点 color = 0x00ff00; // 矢印の色 } if(xyz == 'z'){ direction = new THREE.Vector3(0, 0, 1); // 矢印の向き(Z方向) start = new THREE.Vector3(0, 0, -axisLength / 2); // 矢印の始点 color = 0x00cccc; // 矢印の色 } const axis = new THREE.ArrowHelper(direction, start, axisLength + axisHeadLength * 2, color, axisHeadLength, axisHeadWidth); scene.add(axis); } |
曲線をシーンに追加する
2本のグラフの曲線をシーンに追加する処理を示します。
|
1 2 3 4 5 6 7 8 9 10 11 12 13 14 15 16 17 18 19 20 21 22 |
function addGraph(){ const lineMaterial = new THREE.LineBasicMaterial({color: 0xffffff}); const width = 5; const points1 = []; for ( let x = 1 - width; x <= 1 + width; x += 0.05 ) { const y = Math.pow(x, 2) -2 * x + 4; points1.push(new THREE.Vector3(x, y, 0)); } const geometry1 = new THREE.BufferGeometry().setFromPoints(points1); const line1 = new THREE.Line(geometry1, lineMaterial); scene.add(line1); const points2 = []; for ( let z = -width; z <= width; z += 0.05 ) { const y = -Math.pow(z, 2) + 3; points2.push(new THREE.Vector3(1, y, z)); } const geometry2 = new THREE.BufferGeometry().setFromPoints(points2); const line2 = new THREE.Line(geometry2, lineMaterial); scene.add(line2); } |
球体を追加する
座標(1, 0, √3)と(1, 0, -√3)に球体を追加する処理を示します。
|
1 2 3 4 5 6 7 8 9 10 11 12 13 14 15 16 17 |
function addIntersection(){ const geometry = new THREE.SphereGeometry( 0.25, 32, 32 ); const material = new THREE.MeshBasicMaterial( {color: 0xffff00} ); sphere1 = new THREE.Mesh(geometry, material); sphere2 = new THREE.Mesh(geometry, material); sphere1.position.x = 1; sphere1.position.y = 0; sphere1.position.z = Math.sqrt(3); sphere2.position.x = 1; sphere2.position.y = 0; sphere2.position.z = -Math.sqrt(3); scene.add(sphere1); scene.add(sphere2); } |
レンダリング
レンダリングをする処理を示します。isAutoRotationフラグがtrueのときはカメラは自動で原点の周りを回転します。
|
1 2 3 4 5 6 7 8 9 10 11 12 13 14 15 16 17 18 19 |
function render() { requestAnimationFrame(render); controls.update(); if(isAutoRotation){ // カメラは原点の周りを回転する rot += 0.5; // 毎フレーム角度を0.5度ずつ足していく // ラジアンに変換する const radian = (rot * Math.PI) / 180; // 角度に応じてカメラの位置を設定 camera.position.x = 25 * Math.sin(radian); camera.position.y = 5; camera.position.z = 25 * Math.cos(radian); camera.lookAt(new THREE.Vector3(0, 0, 0)); } renderer.render(scene, camera); showTextFields(); // 後述 } |
ボタンをクリックしたら自動回転を開始したり停止する処理をおこないます。
|
1 2 3 4 |
function autoRotation(){ isAutoRotation = !isAutoRotation; document.getElementById('auto-rotation').innerText = isAutoRotation ? '自動回転を中止する' : '自動で回転させる'; } |
グラフとY = 0の交点に’1+√3 i’と’1-√3 i’の文字列を表示させたいのですが、カメラの位置が変更されると表示する座標を変えなければなりません。showTextFields関数は交点のスクリーン座標を取得してテキストフィールドを適切な位置に移動させます。
3Dオブジェクトのスクリーン座標を取得する
|
1 2 3 4 5 6 7 8 9 10 11 12 13 14 15 16 17 18 |
function showTextFields(){ // スクリーン座標を取得したい3Dオブジェクト、テキストフィールド、表示させる文字列を配列に格納する const arr1 = [sphere1, sphere2]; const arr2 = [document.getElementById('tf1'), document.getElementById('tf2')]; const arr3 = ['1+√3 i', '1-√3 i']; for(let i = 0; i < 2; i++){ // 交点のワールド座標からスクリーン座標を取得する const worldPosition = arr1[i].getWorldPosition(new THREE.Vector3()); const projection = worldPosition.project(camera); const sx = (width / 2) * (+projection.x + 1.0); const sy = (height / 2) * (-projection.y + 1.0); const tf = arr2[i]; tf.style.transform = `translate(${sx}px, ${sy}px)`; tf.innerHTML = arr3[i]; } } |
