今回はタッチタイプ練習アプリを作ります。あえて作らなくてもいくらでもフリーで使えるものがありますが、自作してみることにします。
あとYouTubeの動画でも有益なものがあります。これがおすすめです。
まずは単純なものから

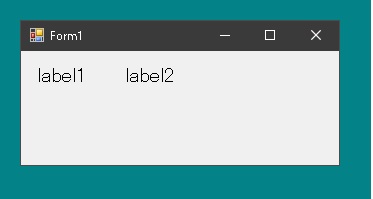
デザイナでこんなものをつくります。ラベルをふたつ貼り付けています。ここにお題を表示させ、キーが押されたら正しいかどうか判定して正解、不正解を表示するというものです。
KeyDownイベントではなく、ここではKeyPressイベントを利用します。
コンストラクタ内で
|
1 2 3 4 5 6 |
public Form1() { InitializeComponent(); KeyPress += Form1_KeyPress; Load += Form1_Load; } |
それからフィールド変数として配列を用意して
|
1 2 3 4 5 6 7 8 9 10 11 12 13 14 15 |
char[] chars = { 'a', 'b', 'c', 'd', 'e', 'f', 'g', 'h', 'i', 'j', 'k', 'l', 'm', 'n', 'o', 'p', 'q', 'r', 's', 't', 'u', 'v', 'w', 'x', 'y', 'z', }; Random random = new Random(); void ShowNext() { int i = random.Next(chars.Length); label1.Text = chars[i].ToString(); } |
で、formが表示されたら
|
1 2 3 4 |
private void Form1_Load(object sender, EventArgs e) { ShowNext(); } |
そして文字キーが押されたら
|
1 2 3 4 5 6 7 8 9 10 11 |
private void Form1_KeyPress(object sender, KeyPressEventArgs e) { if (e.KeyChar.ToString() == label1.Text) { label2.Text = "OK!"; ShowNext(); } else { label2.Text = "Miss!"; } } |
正しいキーが押されていたら「OK!」と表示して次のお題を出題、間違ってたら「Miss!」と表示させます。
これだけでは使い物にならないので、もうちょっと機能を持たせます。表示された文字がどの指で押すかわかるようにナビを表示させます。
q、a、zなら左手小指、qなら上から2段目、aなら三段目というように。
そこでフィールド変数として以下のような配列をつくり、
|
1 2 3 4 5 6 7 8 9 10 11 12 13 14 15 16 17 18 19 20 21 22 23 24 25 26 27 28 29 30 31 32 33 34 35 36 37 38 39 40 41 42 43 44 45 46 47 48 |
char[] first = { '1', '2', '3', '4', '5', '6', '7', '8', '9', '0', '-', '^', '\\' }; char[] second = { 'q', 'w', 'e', 'r', 't', 'y', 'u', 'i', 'o', 'p', '@', '[', }; char[] third = { 'a', 's', 'd', 'f', 'g', 'h', 'j', 'k', 'l', ';', ':', ']', }; char[] fourth = { 'z', 'x', 'c', 'v', 'b', 'n', 'm', ',', '.', '/', '\\', }; char[] leftLittleFinger = { '1', 'q', 'a', 'z', }; char[] leftRingFinger = { '2', 'w', 's', 'x', }; char[] leftMiddleFinger = { '3', 'e', 'd', 'c', }; char[] leftIndexFingerOutside = { '4', 'r', 'f', 'v', }; char[] leftIndexFingerInside = { '5', 't', 'g', 'b', }; char[] rightIndexFingerInside = { '6', 'y', 'h', 'n', }; char[] rightIndexFingerOutside = { '7', 'u', 'j', 'm', }; char[] rightMiddleFinger = { '8', 'i', 'k', ',', }; char[] rightRingFinger = { '9', 'o', 'l', '.', }; char[] rightLittleFinger = { '0', 'p', ';', '/', }; char[] rightLittleFinger2 = { '-', '@', ':', '\\', }; char[] rightLittleFinger3 = { '^', '[', ']', '\\', }; |
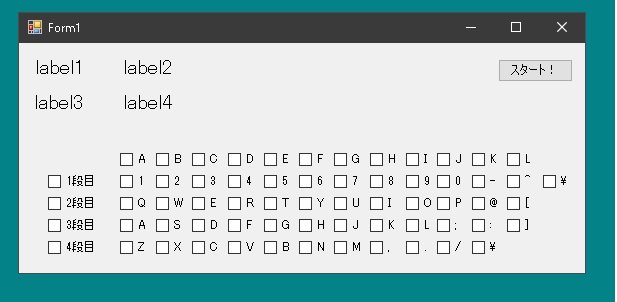
フォームにlabel3とlabel4を貼り付けて、ShowNaviというメソッドでナビゲーションを表示させます。
|
1 2 3 4 5 6 7 8 9 10 11 12 13 14 15 16 17 18 19 20 21 22 23 24 25 26 27 28 29 30 31 32 33 34 35 36 37 38 39 40 41 |
void ShowNavi(char c) { string navi = ""; if (first.Any(x => x == c)) navi = "1段目"; else if (second.Any(x => x == c)) navi = "2段目"; else if (third.Any(x => x == c)) navi = "3段目"; else if (fourth.Any(x => x == c)) navi = "4段目"; label3.Text = navi; if (leftLittleFinger.Any(x => x == c)) navi = "左手 小指"; else if (leftRingFinger.Any(x => x == c)) navi = "左手 薬指"; else if (leftMiddleFinger.Any(x => x == c)) navi = "左手 中指"; else if (leftIndexFingerOutside.Any(x => x == c)) navi = "左手 人差し指(外側)"; else if (leftIndexFingerInside.Any(x => x == c)) navi = "左手 人差し指(内側)"; else if (rightIndexFingerInside.Any(x => x == c)) navi = "右手 人差し指(内側)"; else if (rightIndexFingerOutside.Any(x => x == c)) navi = "右手 人差し指(外側)"; else if (rightMiddleFinger.Any(x => x == c)) navi = "右手 中指"; else if (rightRingFinger.Any(x => x == c)) navi = "右手 薬指"; else if (rightLittleFinger.Any(x => x == c)) navi = "右手 小指"; else if (rightLittleFinger2.Any(x => x == c)) navi = "右手 小指"; else if (rightLittleFinger3.Any(x => x == c)) navi = "右手 小指"; label4.Text = navi; } |
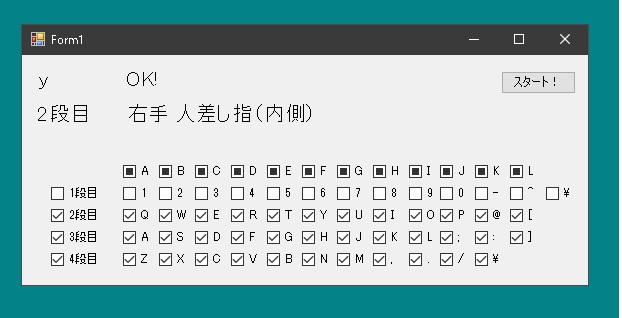
ところが、実際に「2段目 右手 人差し指(外側)」と表示されて、パッとキーを叩ける人はそもそも練習の必要はないのでは? 練習が必要な人は「2段目 右手 人差し指(外側)」と表示されても指が動きません。
一度に多くのことをやろうとするのが失敗の原因です。まずは左手小指だけとか、3段目のキーだけで練習してだんだん守備範囲を増やしていくやり方にしたほうがいいと思います。
そこでチェックボックスをつくってお題として表示される文字を限定します。
formにチェックボックスをそのまま貼り付けるとキーを押しても反応しなくなります。これはチェックボックスがフォーカスを持っていってしまうのでformではKeyPressイベントが発生しなくなるからです。
そこでフォーカスを持っていかないチェックボックスをつくります。そのためには
|
1 2 3 4 5 6 7 8 9 10 11 12 13 14 15 16 17 18 19 20 21 22 23 24 25 26 27 |
public class NoFocusedCheckBox : CheckBox { public NoFocusedCheckBox() { SetStyle(ControlStyles.Selectable, false); } public NoFocusedCheckBox(IContainer container) { container.Add(this); SetStyle(ControlStyles.Selectable, false); } } public class NoFocusedButton : Button { public NoFocusedButton() { SetStyle(ControlStyles.Selectable, false); } public NoFocusedButton(IContainer container) { container.Add(this); SetStyle(ControlStyles.Selectable, false); } } |
ついでにボタンも作りました。
デザイナで以下のように作り替えます。

|
1 2 3 4 5 6 7 8 |
char[] chars = { 'a', 'b', 'c', 'd', 'e', 'f', 'g', 'h', 'i', 'j', 'k', 'l', 'm', 'n', 'o', 'p', 'q', 'r', 's', 't', 'u', 'v', 'w', 'x', 'y', 'z', }; |
としていたのは、配列ではなくリストに変更します。
|
1 2 3 |
Listchar[] chars = {} List<char> chars = new List<char>(); |
あと、配列がリストに変更されたので、ShowNext()を一部変更します。
|
1 2 3 4 5 6 7 8 9 10 |
void ShowNext() { if (chars.Count == 0) return; int i = random.Next(chars.Count); // chars.Lengthではなくchars.Countに変更 label1.Text = chars[i].ToString(); ShowNavi(chars[i]); } |
そして
|
1 2 3 4 5 6 7 |
private void checkBoxA_CheckedChanged(object sender, EventArgs e) { if(checkBoxA.Checked) chars.Add('a'); else chars.Remove('a'); } |
チェックボックスがチェックされたら文字を追加し、チェックが外されたら文字を取り除きます。
最初はcharsのなかは空っぽです。チェックボックスにチェックをいれてスタートボタンを押すとお題が表示されるように変更しました。
|
1 2 3 4 |
private void buttonStart_Click(object sender, EventArgs e) { ShowNext(); } |
あと、縦列、横列を同時に選択できると便利ですね。チェックボックスには3状態チェックボックスがあります。全部選択されているわけではないけど、すべて非選択になっているわけでもない。こんなときに使います。
|
1 |
checkBoxLeftLittleFinger.ThreeState = true; |
チェックボックスの状態が変化したら他のチェックボックスの状態も変化させる必要があるのですが、それによってまたまた他のチェックボックスが変化して無限ループのような状態にならないように気をつける必要があります。
|
1 2 3 4 5 6 7 8 9 10 11 12 13 14 15 16 17 18 19 20 21 22 23 24 25 26 27 28 29 30 31 32 33 34 35 36 37 38 39 40 41 42 43 44 45 46 47 48 49 50 51 52 53 54 55 56 57 58 59 60 61 62 63 64 65 66 67 68 69 70 71 72 73 74 75 76 77 78 79 80 81 82 83 84 85 86 87 88 89 90 91 92 93 94 95 96 97 98 99 100 101 102 103 104 105 106 |
bool ignoreCheckStateChange1 = false; // フィールド変数 bool ignoreCheckStateChange2 = false; // フィールド変数 NoFocusedCheckBox[] boxesFirst; // フィールド変数 NoFocusedCheckBox[] boxesLeftLittleFinger; // 左手小指のチェックボックスがオンになったら、1,Q、A、Zのチェックボックスをオンにし、 // 左手小指のチェックボックスがオフになったら、1,Q、A、Zのチェックボックスをオフにする。 private void checkBoxLeftLittleFinger_CheckedChanged(object sender, EventArgs e) { ignoreCheckStateChange2 = true; NoFocusedCheckBox[] boxes = GetCheckBoxesLeftLittleFinger(); NoFocusedCheckBox checkBox = checkBoxLeftLittleFinger; if (checkBox.CheckState == CheckState.Checked) { foreach (var box in boxes) box.Checked = true; } else if (checkBox.CheckState == CheckState.Unchecked) { foreach (var box in boxes) box.Checked = false; } ignoreCheckStateChange2 = false; } // 2段目のチェックボックスがオンになったら、Q、W、E、R、T、Y、U、I、O、P、@、[のチェックボックスをオンにし、 // 2段目のチェックボックスがオフになったら、Q、W、E、R、T、Y、U、I、O、P、@、[のチェックボックスをオフにする。 private void checkBoxSecond_CheckedChanged(object sender, EventArgs e) { ignoreCheckStateChange1 = true; if (checkBoxSecond.CheckState == CheckState.Checked) { foreach (var box in GetCheckBoxesSecond()) box.Checked = true; } else if (checkBoxSecond.CheckState == CheckState.Unchecked) { foreach (var box in GetCheckBoxesSecond()) box.Checked = false; } ignoreCheckStateChange1 = false; } // Qのチェックボックスがオンになったら、フィールド変数のcharsに文字'q'を追加するとともに、 // 2段目と左手小指の他のボックスがどのようになっているか調べて、2段目と左手小指のチェックボックスの状態を変化させる。 private void checkBoxQ_CheckedChanged(object sender, EventArgs e) { if (checkBoxQ.Checked) chars.Add('q'); else chars.Remove('q'); if (!ignoreCheckStateChange1) ChangeCheckBoxSecondIfNeed(); if (!ignoreCheckStateChange2) ChangeCheckBoxLeftLittleFingerIfNeed(); } void ChangeCheckBoxSecondIfNeed() { NoFocusedCheckBox[] boxes = this.GetCheckBoxesSecond(); NoFocusedCheckBox checkBox = checkBoxThird; if (!boxes.Any(x => !x.Checked)) checkBoxSecond.CheckState = CheckState.Checked; else if (!boxes.Any(x => x.Checked)) checkBoxSecond.CheckState = CheckState.Unchecked; else checkBoxSecond.CheckState = CheckState.Indeterminate; } void ChangeCheckBoxLeftRingFingerIfNeed() { NoFocusedCheckBox[] boxes = GetCheckBoxesLeftRingFinger(); NoFocusedCheckBox checkBox = checkBoxLeftRingFinger; if (!boxes.Any(x => !x.Checked)) checkBox.CheckState = CheckState.Checked; else if (!boxes.Any(x => x.Checked)) checkBox.CheckState = CheckState.Unchecked; else checkBox.CheckState = CheckState.Indeterminate; } NoFocusedCheckBox[] GetCheckBoxesSecond() { NoFocusedCheckBox[] boxes = { checkBoxQ, checkBoxW,checkBoxE,checkBoxR, checkBoxT, checkBoxY,checkBoxU,checkBoxI, checkBoxO, checkBoxP,checkBoxAt, checkBoxKakuStart, }; return boxes; } NoFocusedCheckBox[] GetCheckBoxesLeftRingFinger() { NoFocusedCheckBox[] boxes = { checkBox2, checkBoxW,checkBoxS,checkBoxX, }; return boxes; } |

